Hosting and Deployment
Intoduction
For all of these approaches, we are assuming that you have already created a website and/or blog with Bestatic on your local computer that you are ready to deploy on the web. If you have not done so, please complete the Quickstart to generate it, at least for testing purposes.
Other than manual deployment, all other approaches are git-based. For a normal website, you can use any of these git-based approaches to host your website for free. If you have already set up a server, it is perfectly fine to use the manual deployment method.
If you are not familiar Git and GitHub/GitLab at all, there are many free resources that you can use to learn it. You may find that this and this tutorials can get you started pretty quickly. Also, you may consider using GitHub desktop if you want to manage things graphically (the same desktop client also works with GitLab). Here is a quick tutorial on this desktop app. While you should familiarize with basics of Git here, if you are truly impatient, please keep reading: We are providing a very brief introduction to Git.
The first step to all the git-based deployment method is essentially the same: You create a repository on GitHub or GitLab, clone that repo into a folder of your local machine, then add all the website files to that folder, and finally use git add+commit+push options to upload all the files to the GitHub/GitLab repo you created.
Here is a really quick tutorial on how to do this using GitHub (GitLab would work in a very similar way as well). Before starting all these, you should already have a GitHub account. If you do not, it is super simple: Just sign up here for free.
-
Create a repo on GitHub by going to https://github.com/new, filling out all the details, and clicking "Create repository" button below. You can select all the default options for the purpose of this tutorial. You can name your repo whatever you want (with some restrictions, if you are planning to deploy directly from GitHub pages or GitLab pages; see those sections below for details; there are no restrictions if you use GitHub/GitLab only to host the files and deploy using other services). We are assuming you are naming it my-bestatic-repo.
-
If you have not done this already, install Git. Also, install GitHub desktop, if you want to manage Git things graphically without CLI (the linux version is also available).
-
Clone the my-bestatic-repo repo to your local machine and go into that folder. A couple of ways to do this:
-
Using command-line Git: Type the following commands:
1
2
git clone https://github.com/username/my-bestatic-repo.git # Change username/my-bestatic-repo part to correct values cd my-bestatic-repo -
Using GitHub Desktop: After you have logged in to your GitHub Desktop app, click
File > Clone repository...and you should see a popup. Go to the URL tab and paste your "https://github.com/username/my-bestatic-repo.git" value in the Repository URL field and select the folder you want to use in your local system for cloning by choosing the Local path field (you can choose any folder in your system).
-
-
Add all the website files to this my-bestatic-repo local folder on your computer. Then commit and push the changes to remote repo (i.e. on GitHub). A couple of ways to do this:
-
Using command-line Git: After copy pasting all the files from your website's root folder to my-bestatic-repo folder (do not include _output folder to my-bestatic-repo folder), type the following commands:
1
2
3
git add . # add all files in the current directory git commit -m "Adding Bestatic website files" # add a commit message that makes sense to you git push -u origin main # this pushes all the local changes to GitHub -
Using GitHub Desktop: Copy and paste all the files from your website's root folder to my-bestatic-repo folder (do not include _output folder to my-bestatic-repo folder). Then, in the bottom left, in Summary section write "Adding Bestatic website files" (or anything that makes sense to you). Click on "Commit to main", then click on "Push origin" or "Publish branch" from the main panel.
Note that, you can always use this workflow (add-commit-push) via CLI or graphically, to add or update files to your remote GitHub repo.
And, that's it! You can go to https://github.com/username/my-bestatic-repo and view your files.
PS: In case you are locally building the site for testing, make sure that the _output folder is not getting uploaded (since the aim is to build the final site on cloud). While you can just manually delete (or exclude) that folder while putting files to my-bestatic-repo folder, to do this automatically, add a .gitignore file on the root of the my-bestatic-repo folder which should contain a line with just this:
1_output -
Once you have your files on GitHub (or GitLab or Bitbucket), you can choose any of the following options to enable continuous deployment. Then, whenever you push any changes to your GitHub repo, these services will automatically detect those, rebuild the website, and deploy it to your URL. You can also use custom domains, free SSL, etc., as described below.
Which one to choose? Here is a good comparison of their free tiers. All of these services are pretty reliable and should be sufficient for you to host your static-site completely free of cost.
How do we manage this website?
The files of this website are hosted on GitHub and the site is deployed from Netlify, as of now.
GitHub pages
We are assuming that: A) You are now familiar with the basics of Git and GitHub (just see the section above for quick introduction); B) You already have a GitHub account (if not, it is super simple; just sign up here for free).
Now, to get your website online with GitHub pages, do the following:
-
Create a repo named <username>.github.io, where username is your username on the GitHub. If you have already pushed your site to another repo, rename the repo instead. This will make sure GitHub pages will treat your site as "User site".
However, if are already using that repo name for another site and you cannot change that, then you have to make this Bestatic website available as a "Project site" (differences are delineated here). In that case, you can use any repo name that you like but you have to deploy a bit differently; see more details below at the Note on "Project" site.
-
Upload the files of your Bestatic website folder to the default branch of your repository, as described above. The default branch is usually main.
-
Then, visit your GitHub repository from your browser. Go to Settings tab from the top and make the repo public (if it is not already public) by scrolling down to the "Danger Zone" and clicking "Change visibility". Note: GitHub pages do not allow to deploy your website unless your repo is public or you have a GitHub Enterprise account.
-
While you are still on the Settings tab, from the left navigation menu, click on Pages. Then, change the Source to
GitHub Actions. You do not have to press any Save button or anything. -
Create a file in your local GitHub folder at: .github/workflows/bestatic.yml and paste the following content (we took inspiration from Hugo here):
 1
 2
 3
 4
 5
 6
 7
 8
 9
10
11
12
13
14
15
16
17
18
19
20
21
22
23
24
25
26
27
28
29
30
31
32
33
34
35
36
37
38
39
40
41
42
43
44
45
46
47
48
49
50
51
52
53
54
55
56
57
58
59
60
# Sample workflow for building and deploying a Hugo site to GitHub Pages name: Deploy Bestatic site to GitHub Pages on: # Runs on pushes targeting the default branch push: branches: ["main"] # Allows you to run this workflow manually from the Actions tab workflow_dispatch: # Sets permissions of the GitHub_TOKEN to allow deployment to GitHub Pages permissions: contents: read pages: write id-token: write # Allow only one concurrent deployment, skipping runs queued between the run in-progress and latest queued. # However, do NOT cancel in-progress runs as we want to allow these production deployments to complete. concurrency: group: "pages" cancel-in-progress: false # Default to bash defaults: run: shell: bash jobs: # Build job build: runs-on: ubuntu-latest steps: - name: Install Bestatic run: pip install Bestatic - name: Checkout uses: actions/checkout@v4 with: submodules: recursive - name: Setup Pages id: pages uses: actions/configure-pages@v4 - name: Build with Bestatic run: bestatic - name: Upload artifact uses: actions/upload-pages-artifact@v3 with: path: ./_output # Deployment job deploy: environment: name: github-pages url: ${{ steps.deployment.outputs.page_url }} runs-on: ubuntu-latest needs: build steps: - name: Deploy to GitHub Pages id: deployment uses: actions/deploy-pages@v4 -
Add, commit, and push this to GitHub using the process described in introduction section.
-
Go to the Actions tab on GitHub repo from your browser and click on the latest workflow.
-
Under the deploy step, you will find a link to your live website.
In the future, whenever you push a change from your local repository to GitHub repo, GitHub pages will rebuild your site and deploy the changes automatically.
Now, you should definitely update the siteURL parameter in config.yaml with the correct value (https://<username>.github.io or https://<yourdomain.com>) to generate the correct sitemap.xml file.
Finally, if you wish to setup a custom domain (such as https://<yourdomain.com> or https://<subdomain.yourdomain.com>) for your Bestatic site on GitHub pages, see details here. You should also enable SSL/TLS certificates for your custom domain for free, as per the instruction provided here.
GitLab pages
We are assuming that: A) You are familiar with the basics of Git and GitLab (just see the section above for quick introduction); B) You already have a GitLab account (if not, it is super simple; just sign up here for free).
Now, to get your website online with GitHub pages, do the following:
-
Create a new Project with Project slug <username>.gitlab.io, where username is your username on the Gitlab. If you have already pushed your site to another Project, rename the Project instead (by starting from left-side navigation menu: Settings > General > Advanced > Change path). This will make sure GitLab pages will treat your site as "User site".
However, if are already using that repo name for another site and you cannot change that, then you have to make this Bestatic website available as a "Project site" (differences are delineated here and here). In that case, you can use any repo name that you like but you have to deploy a bit differently; see more details below at the Note on "Project" site.
-
Upload the files of your Bestatic website folder to the default branch of your repository, as described above. The default branch is usually main.
-
Then, visit your GitLab repository from your browser. Start with Settings group from the left navigation bar and go to Settings > General > Visibility, project features, permissions > Pages. Then Toggle the Pages button to enable the access control. Finally, select Everyone or Everyone with access. Save these changes (Save button is at the bottom).
-
Create a file in your the root of your GitLab project/repo folder with filename .gitlab-ci.yml. You can visit the homepage of your repo on GitLab, click on + Set up CI/CD on right navigation panel, and then when new page is shown, click Configure pipeline button at center of the page. This will open the editor where you can add your content. Alternatively, you can also create a .gitlab-ci.yml file at the root of your local repo and then commit and push this to the GitLab repo (as described in introduction section). Either way, the following content should go into that file:
 1
 2
 3
 4
 5
 6
 7
 8
 9
10
11
12
13
14
15
16
# This file is a template, and might need editing before it works on your project. # To contribute improvements to CI/CD templates, please follow the Development guide at: # https://docs.gitlab.com/ee/development/cicd/templates.html default: # Full project: https://www.bestaticpy.com/ image: python:3.10.14-bookworm pages: script: - pip install Bestatic - bestatic -d public artifacts: paths: - public/ environment: production -
Once that file in your GitLab project, you can view that CI/CD jobs are going on and Bestatic is building your website at: https://gitlab.com/<username>/<project-slug>/-/jobs/. After the build has completed, your new website is available at https://<username>.gitlab.io/.
In the future, whenever you push a change from your local repository to GitLab repo, GitLab pages will rebuild your site and deploy the changes automatically.
Now, you should definitely update the siteURL parameter in config.yaml with the correct value (https://<username>.gitlab.io or https://<yourdomain.com>) to generate the correct sitemap.xml file.
Finally, if you wish to setup a custom domain (such as https://<yourdomain.com> or https://<subdomain.yourdomain.com>) for your Bestatic site on Gitlab pages, see details here. You should also enable SSL/TLS certificates for your custom domain for free, via GitLab integration with Let’s Encrypt.
Note on "Project" site
If you are deploying your Bestatic site as a "Project" site on GitHub pages or GitLab pages, in contrast to "User" site, you have to do a couple of things differently as described below.
Custom domain
If you are setting up a custom domain on GitHub or custom domain on Gitlab, you do not have to change anything even if you are deploying as a "Project" site.
-
Make sure in your non-markdown files of your site or theme, no links are provided with /page format; they should be rewritten as https://<username>.github.io/<reponame>/page format (or https://<username>.gitlab.io/<project-slug>/page format, for GitLab). For example, if you are using the default "Amazing" theme, in the static/js/fuse-search.js file, change:
request.open('GET', '/index.json');torequest.open('GET', 'https://<username>.github.io/<reponame>/index.json');(for GitHub) or torequest.open('GET', 'https://<username>.gitlab.io/<ptoject-slug>/index.json');(for GitLab). -
In case of GitHub pages: In the above mentioned .github/workflows/bestatic.yml file, change:
run: bestaticline torun: bestatic -p https://<username>.github.io/<reponame>In case of GitLab pages: In the above mentioned .gitlab-ci.yml file, change
- bestatic -d publicline to- bestatic -d public -p https://<username>.gitlab.io/<project-slug>. You can additionally start at left-side navigation menu on GitLab, go to: Deploy > Pages > Setting, uncheck Use unique domain and Save changes so that your website would be available just on https://<username>.gitlab.io/<project-slug>.
Now, your website should build correctly and you should see all the desired styles, images, etc.
Cloudflare pages
Cloudflare pages provides continuous deployment, a global CDN, full DNS, automated HTTPS, domain registration, and a bunch of other great stuff, with an extremely generous free tier.
We are assuming you at least completed the Quickstart and gone through the introduction above to host your files on GitHub. The procedure will be essentially the same, even if you are using GitLab to host your files.
Now, the following procedure will enable continuous deployment from a GitHub repository (i.e., whenever you push a change to your GitHub repo, Cloudflare will automatically rebuild and deploy your site).
-
Sign up for a Cloudflare Pages account.
-
Add a requirements.txt file to the root location of your GitHub repo. That file should have this line (include the latest version of Bestatic after == sign):
1Bestatic==0.0.28 -
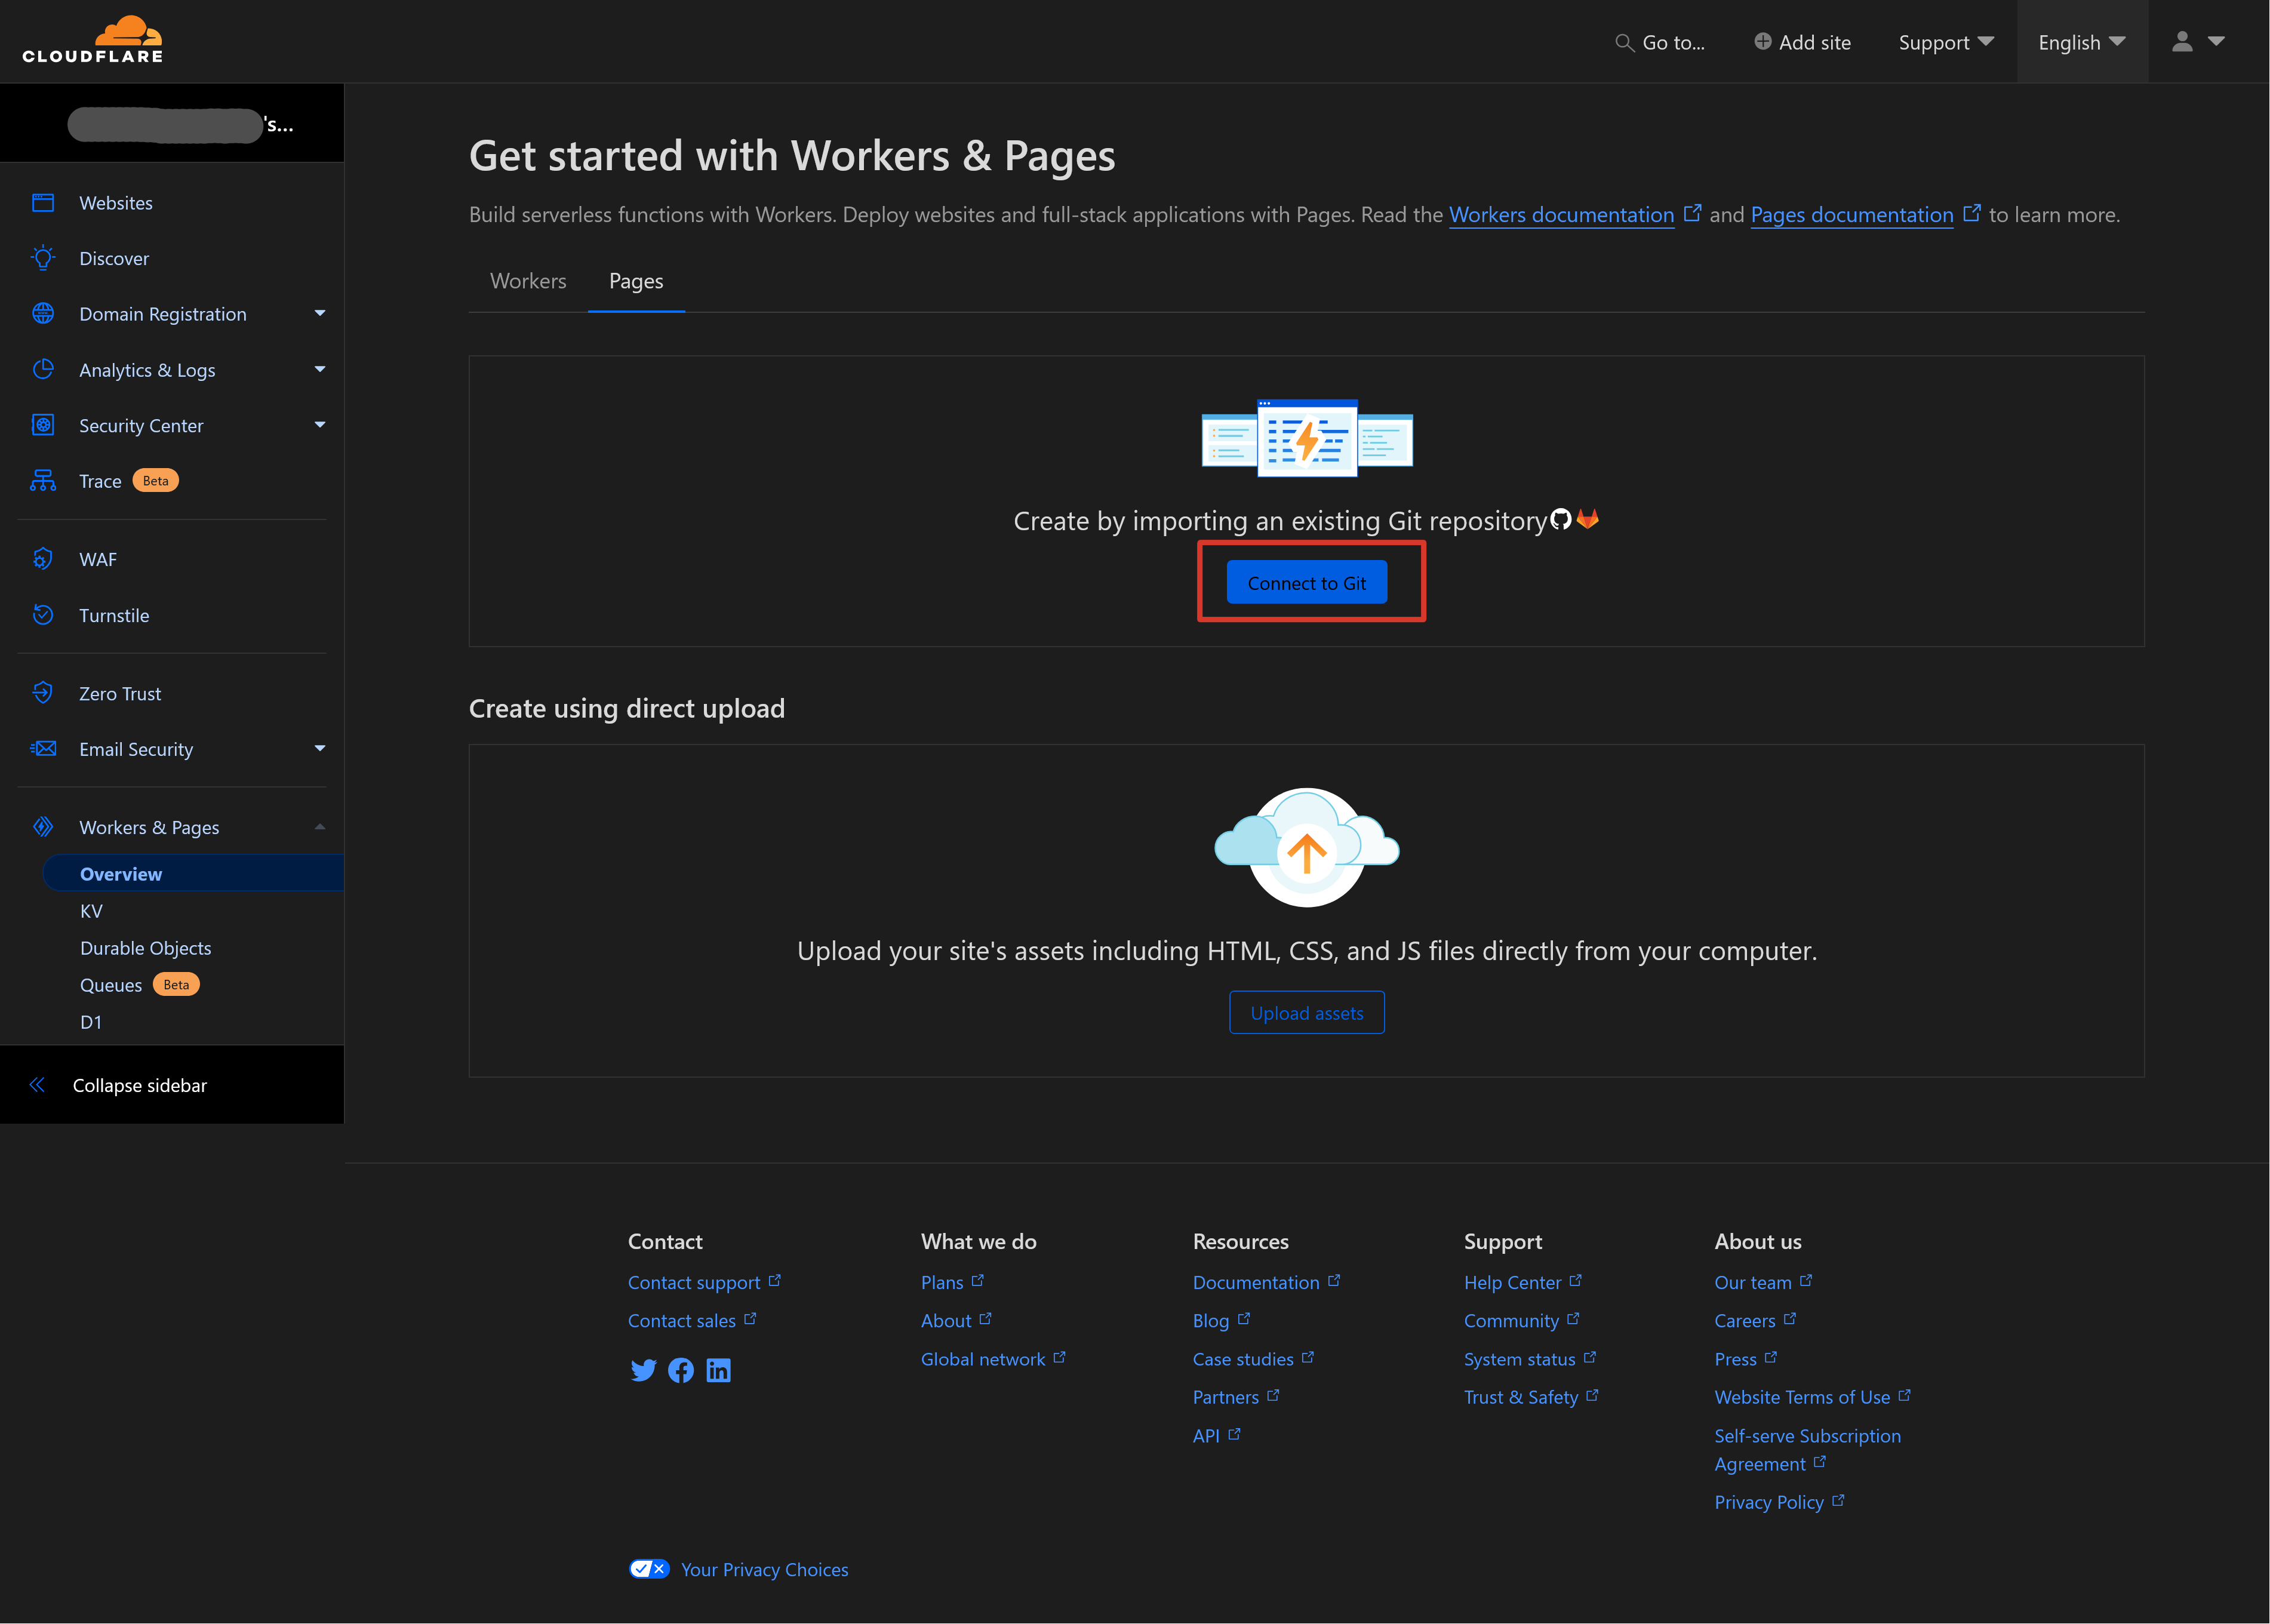
From the Cloudflare Pages dashboard, click on Connect to Git, as shown below.
-
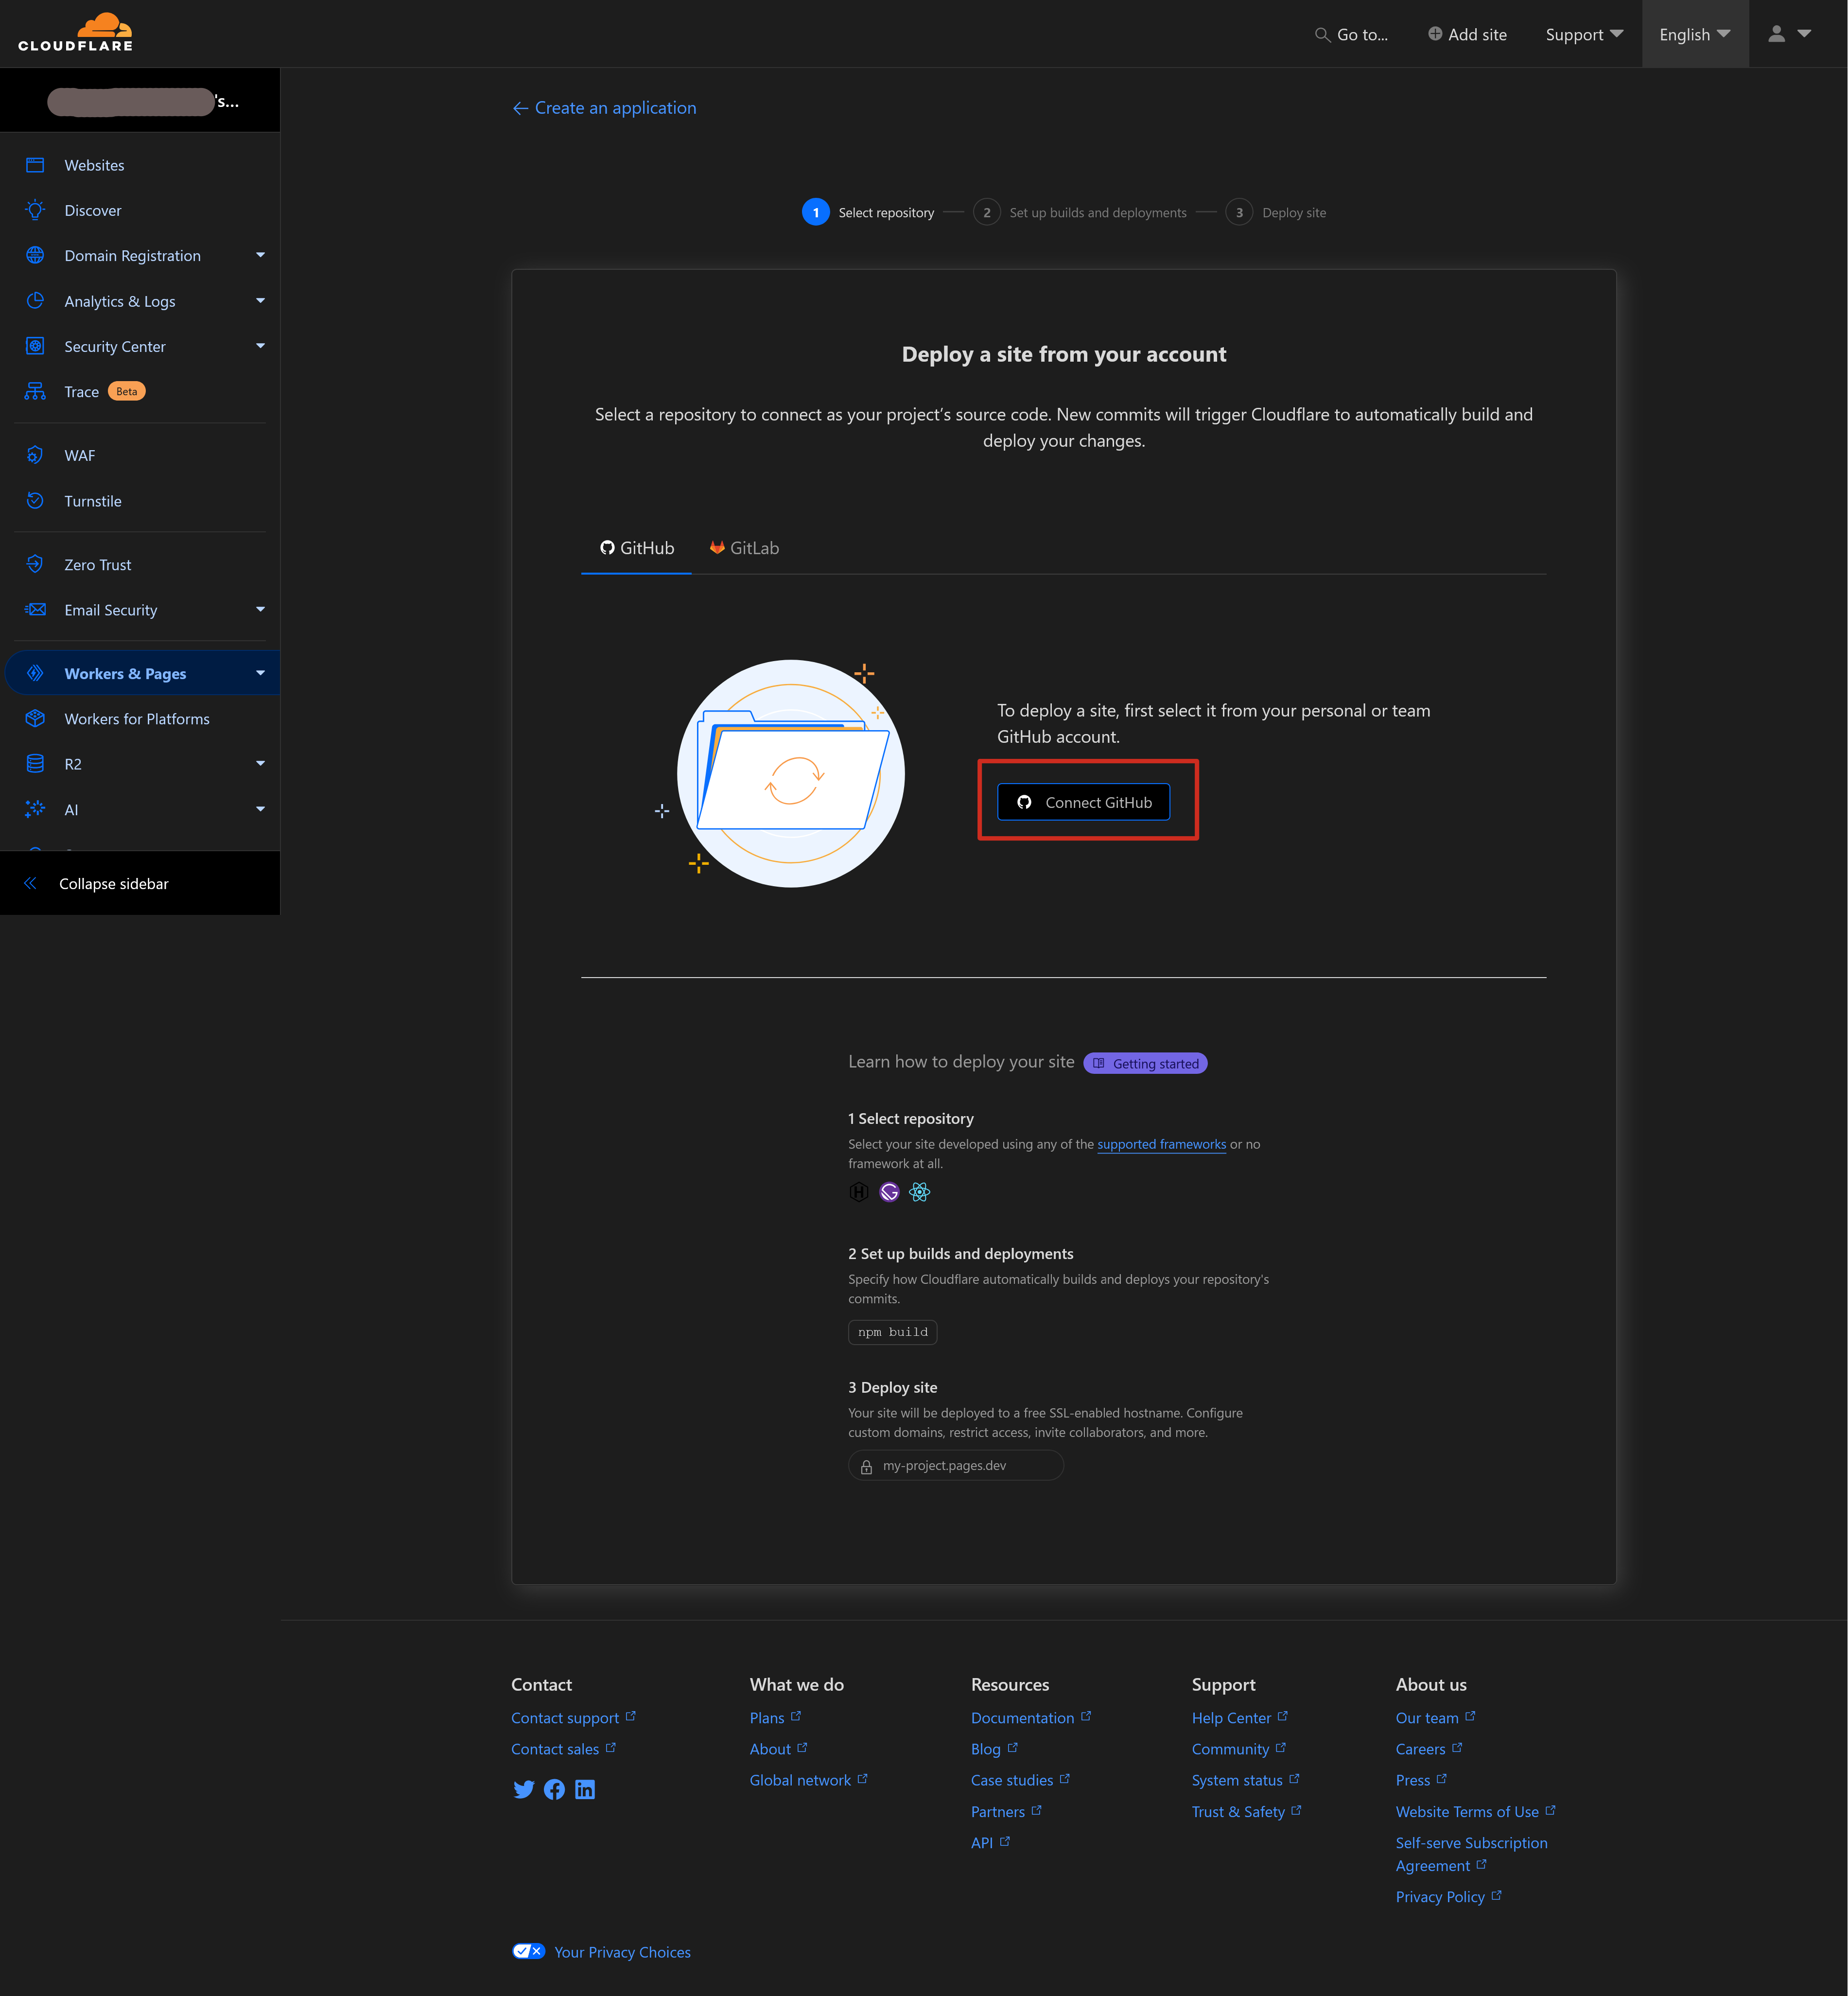
When you see the following screen, select Connect GitHub from the GitHub tab (or select from the GitLab tab, if you are using GitLab).
-
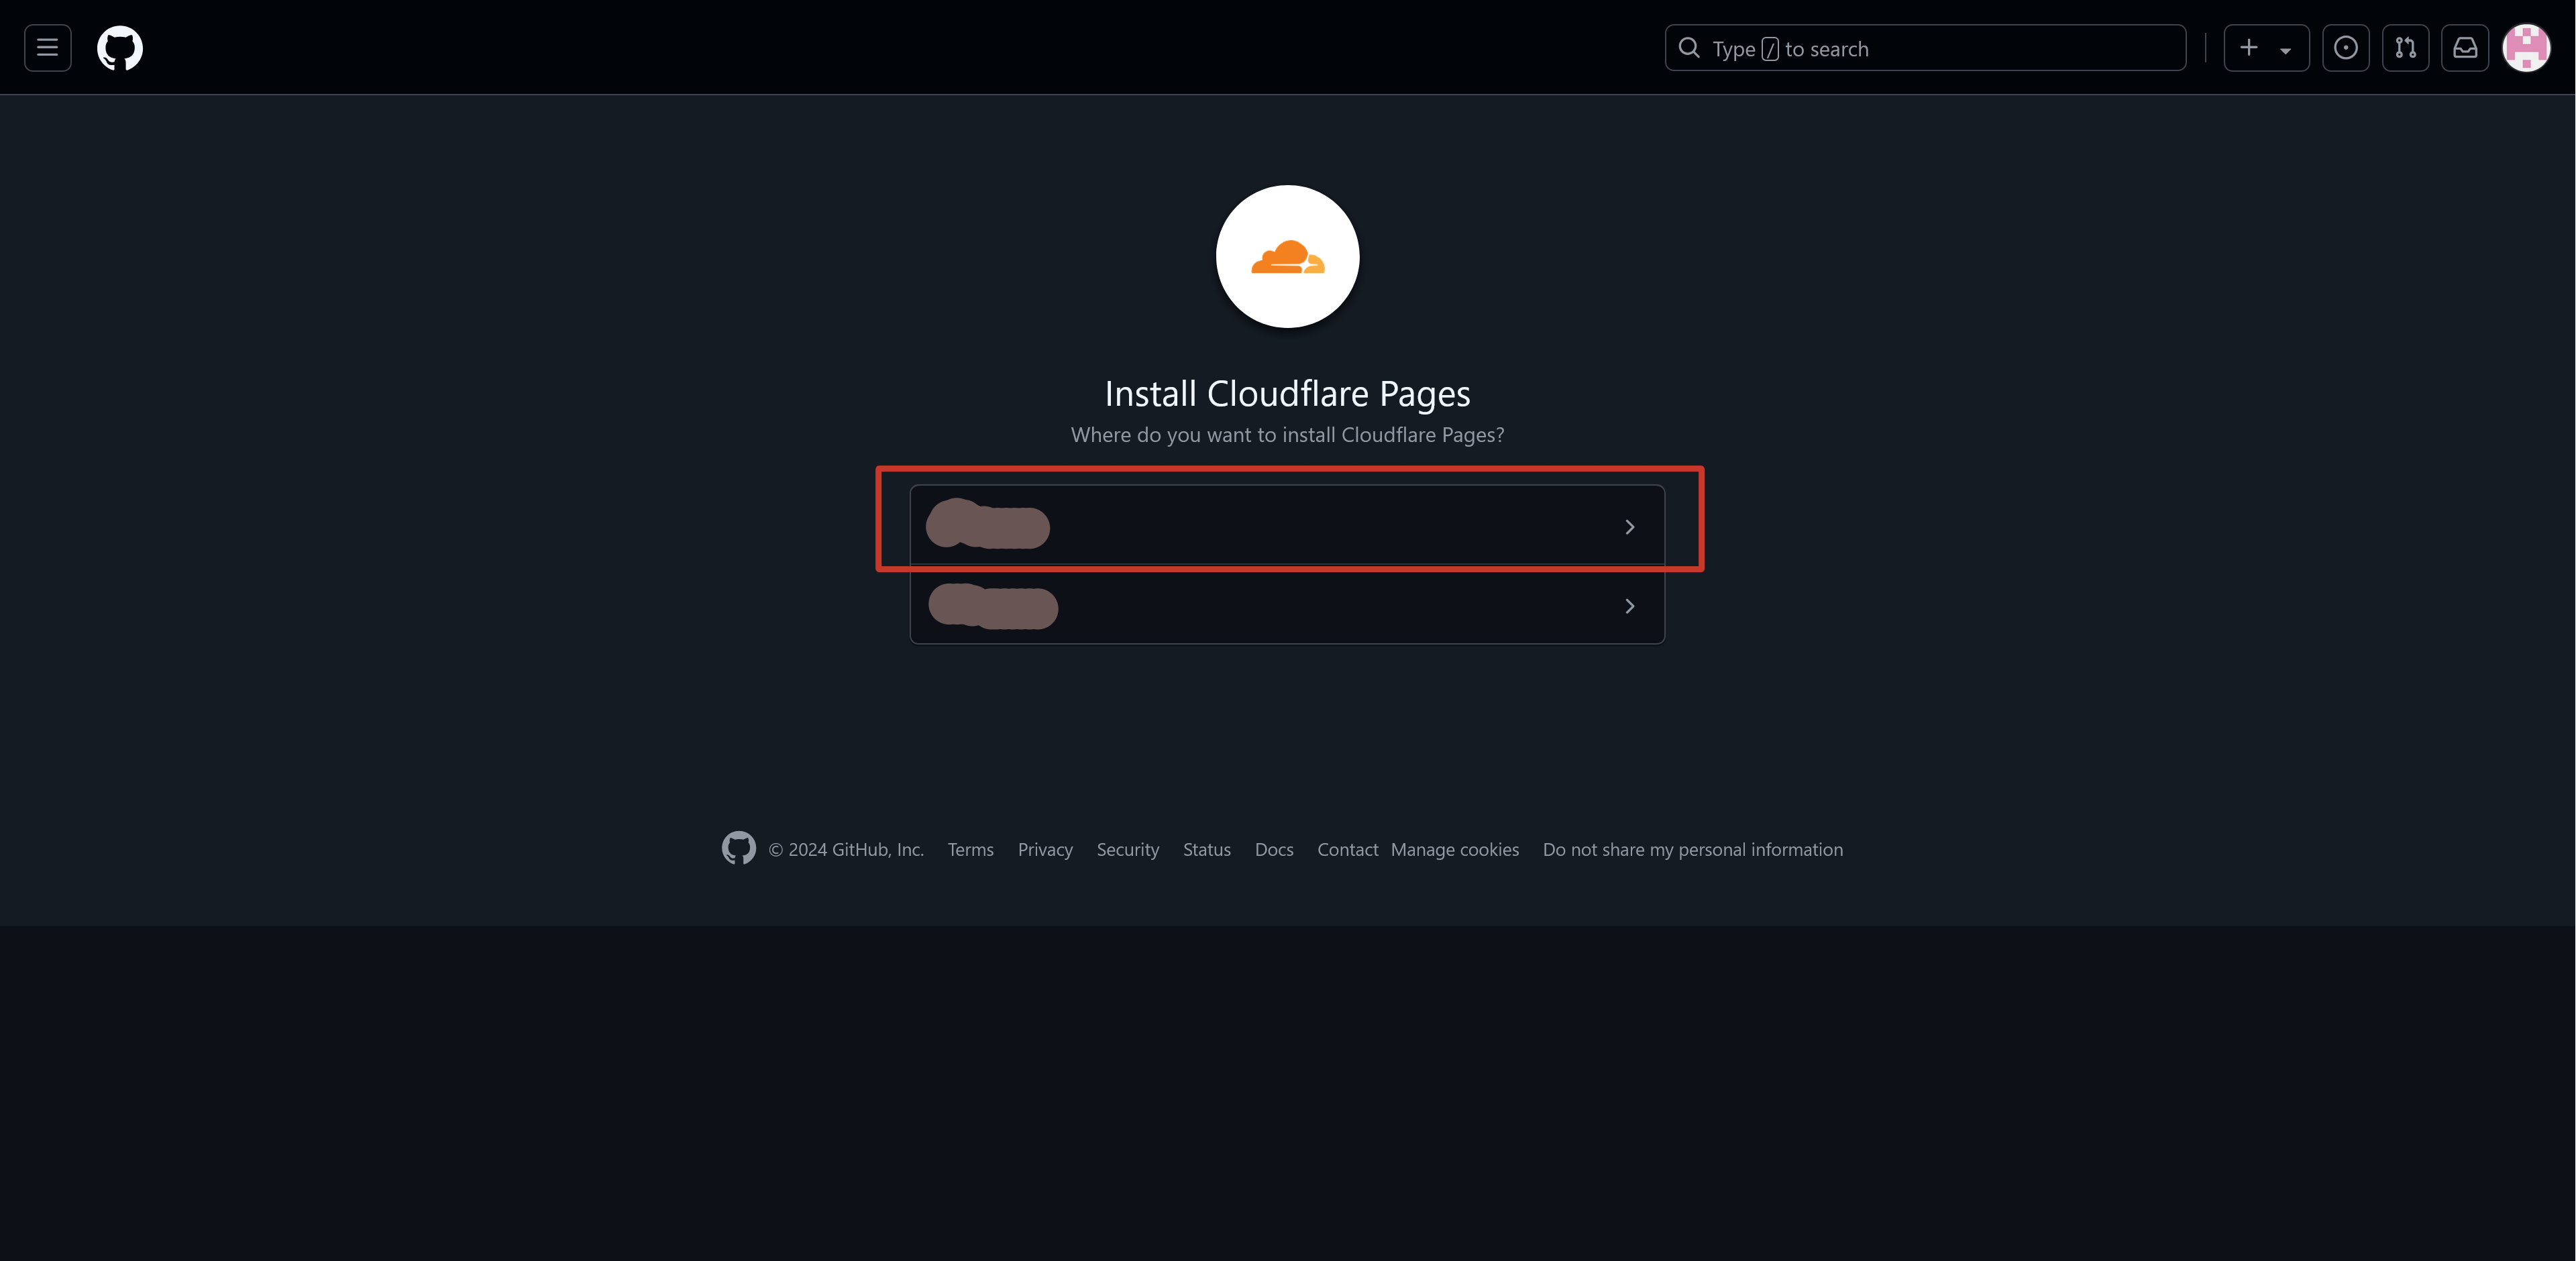
After you login to GitHub by following prompt, you should see the following screen where you should click on the account where you want to Install Cloudflare pages.
-
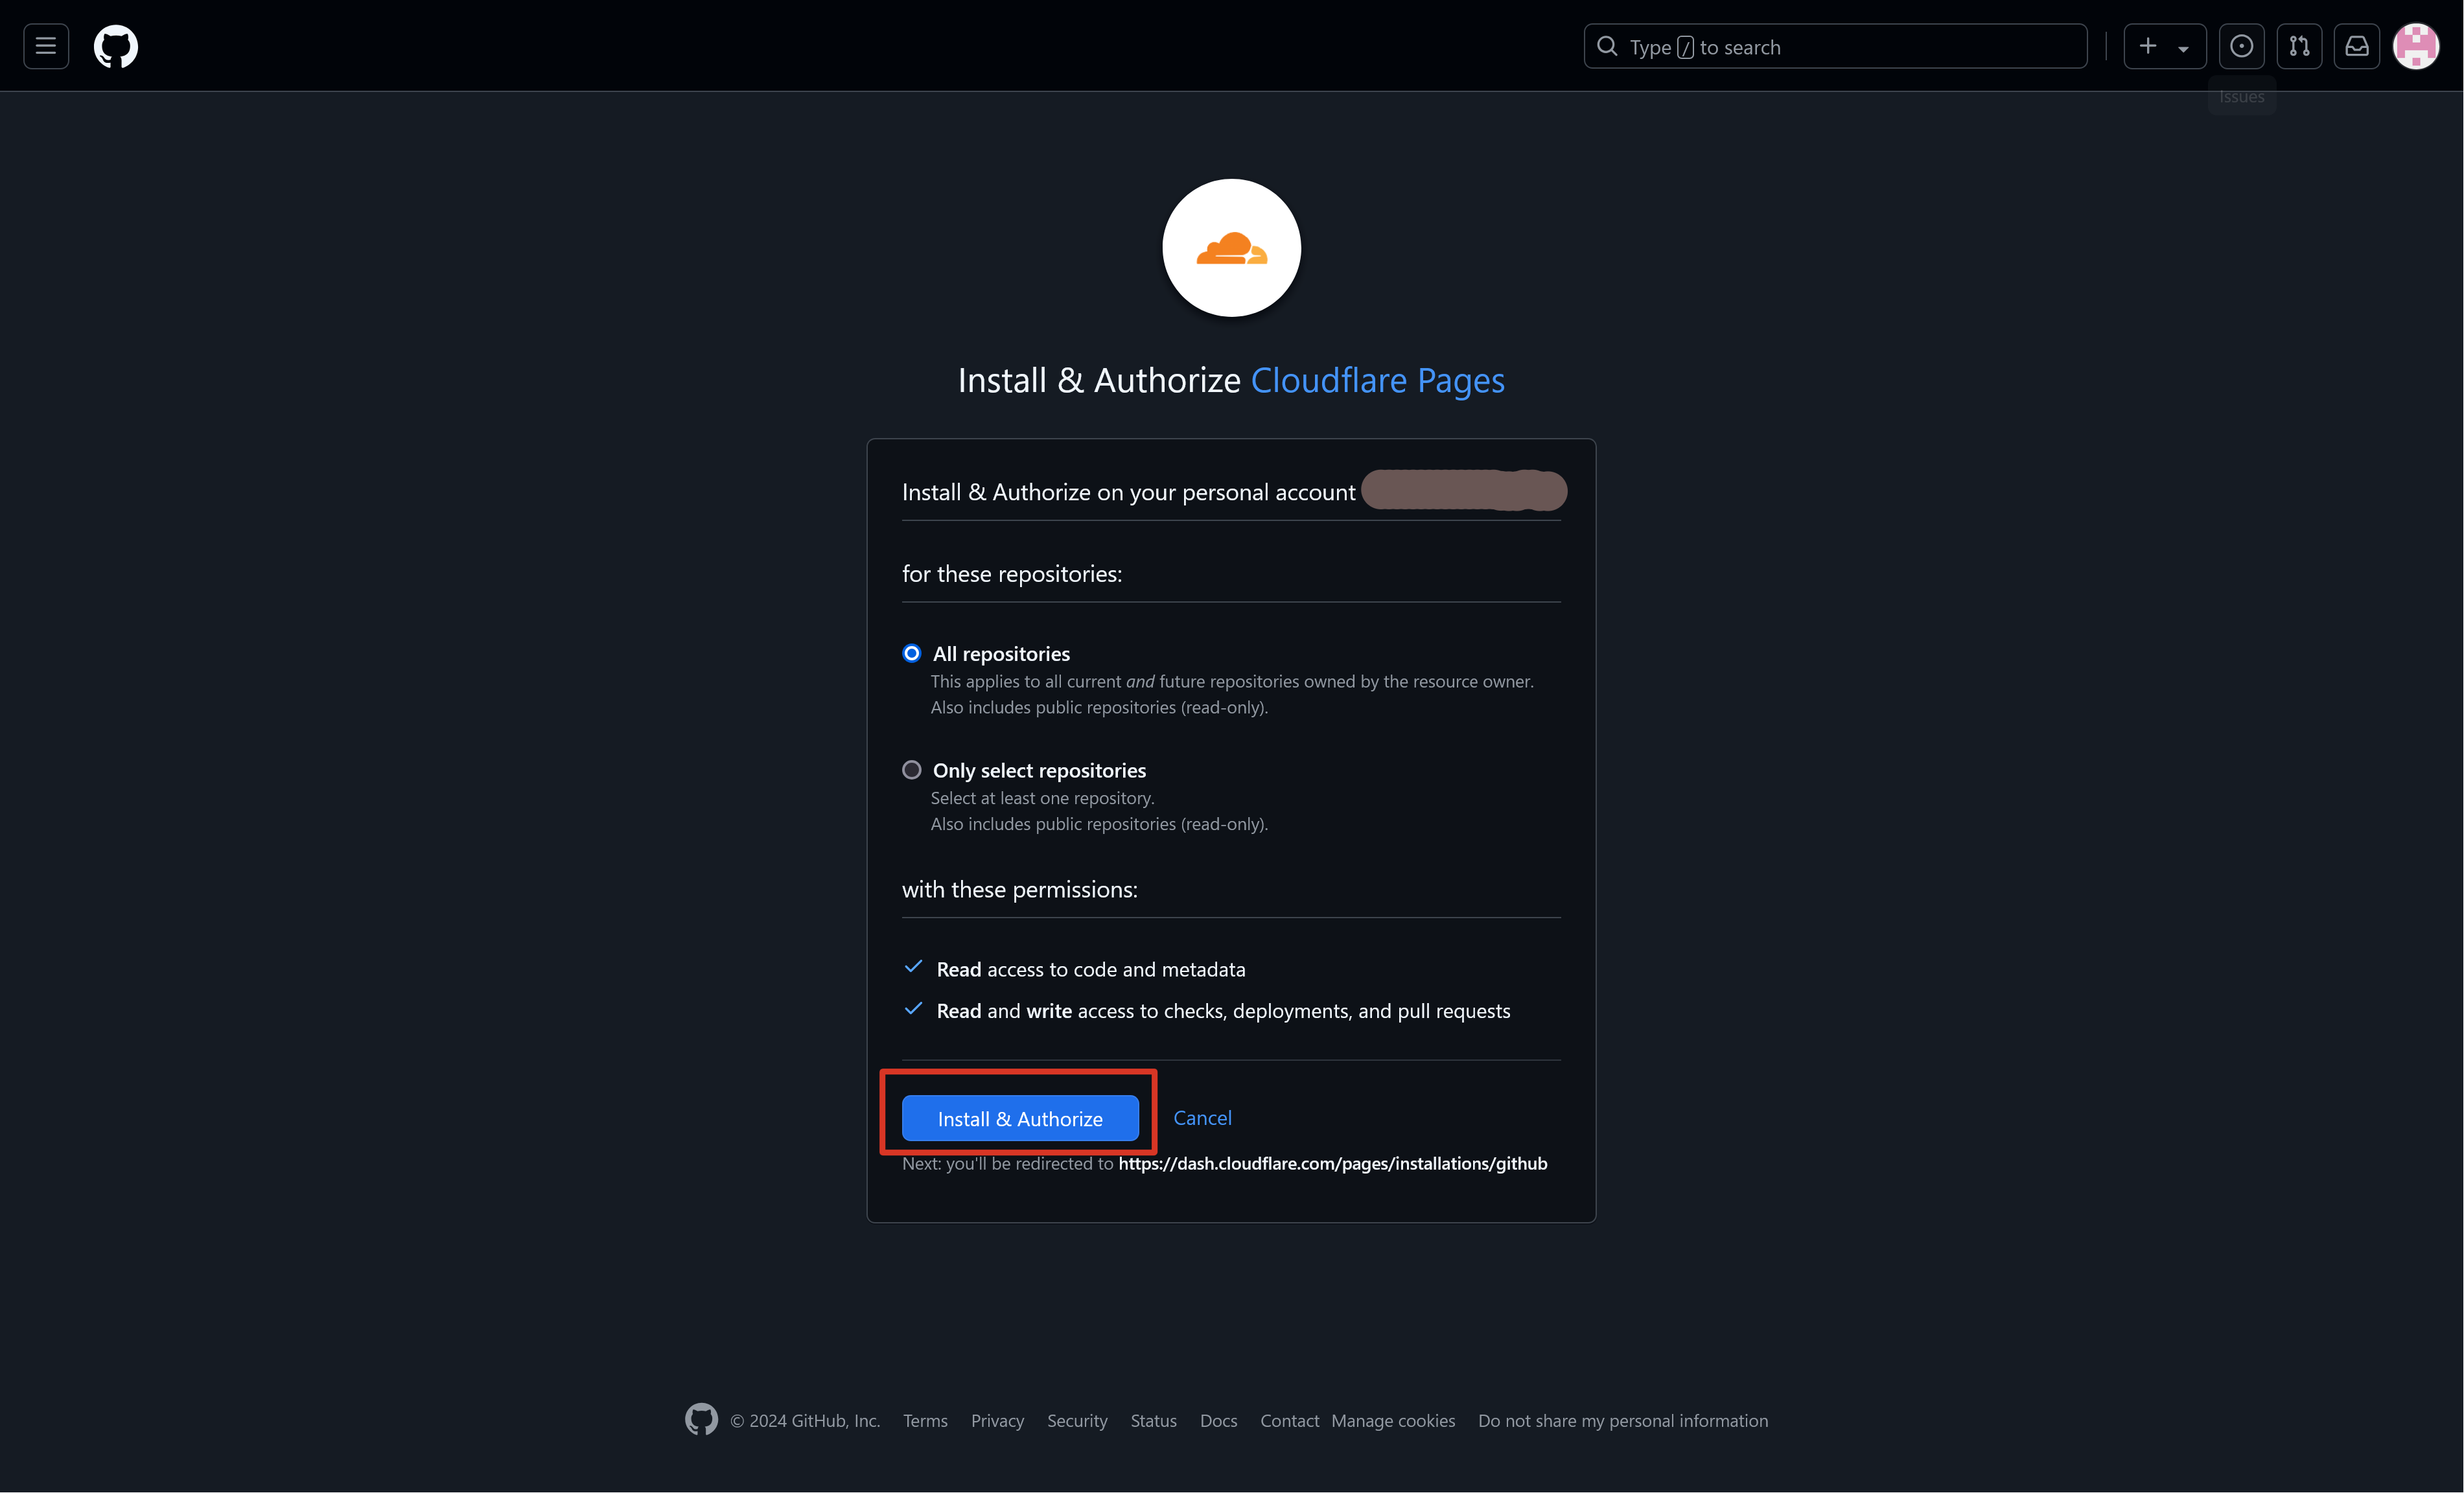
You should then Install & Authorize Cloudflare pages. You can also authorize it to just your Bestatic website repo.
-
After returning to Cloudflare website, select the repo from where you want to build your site and then click on Begin setup button.
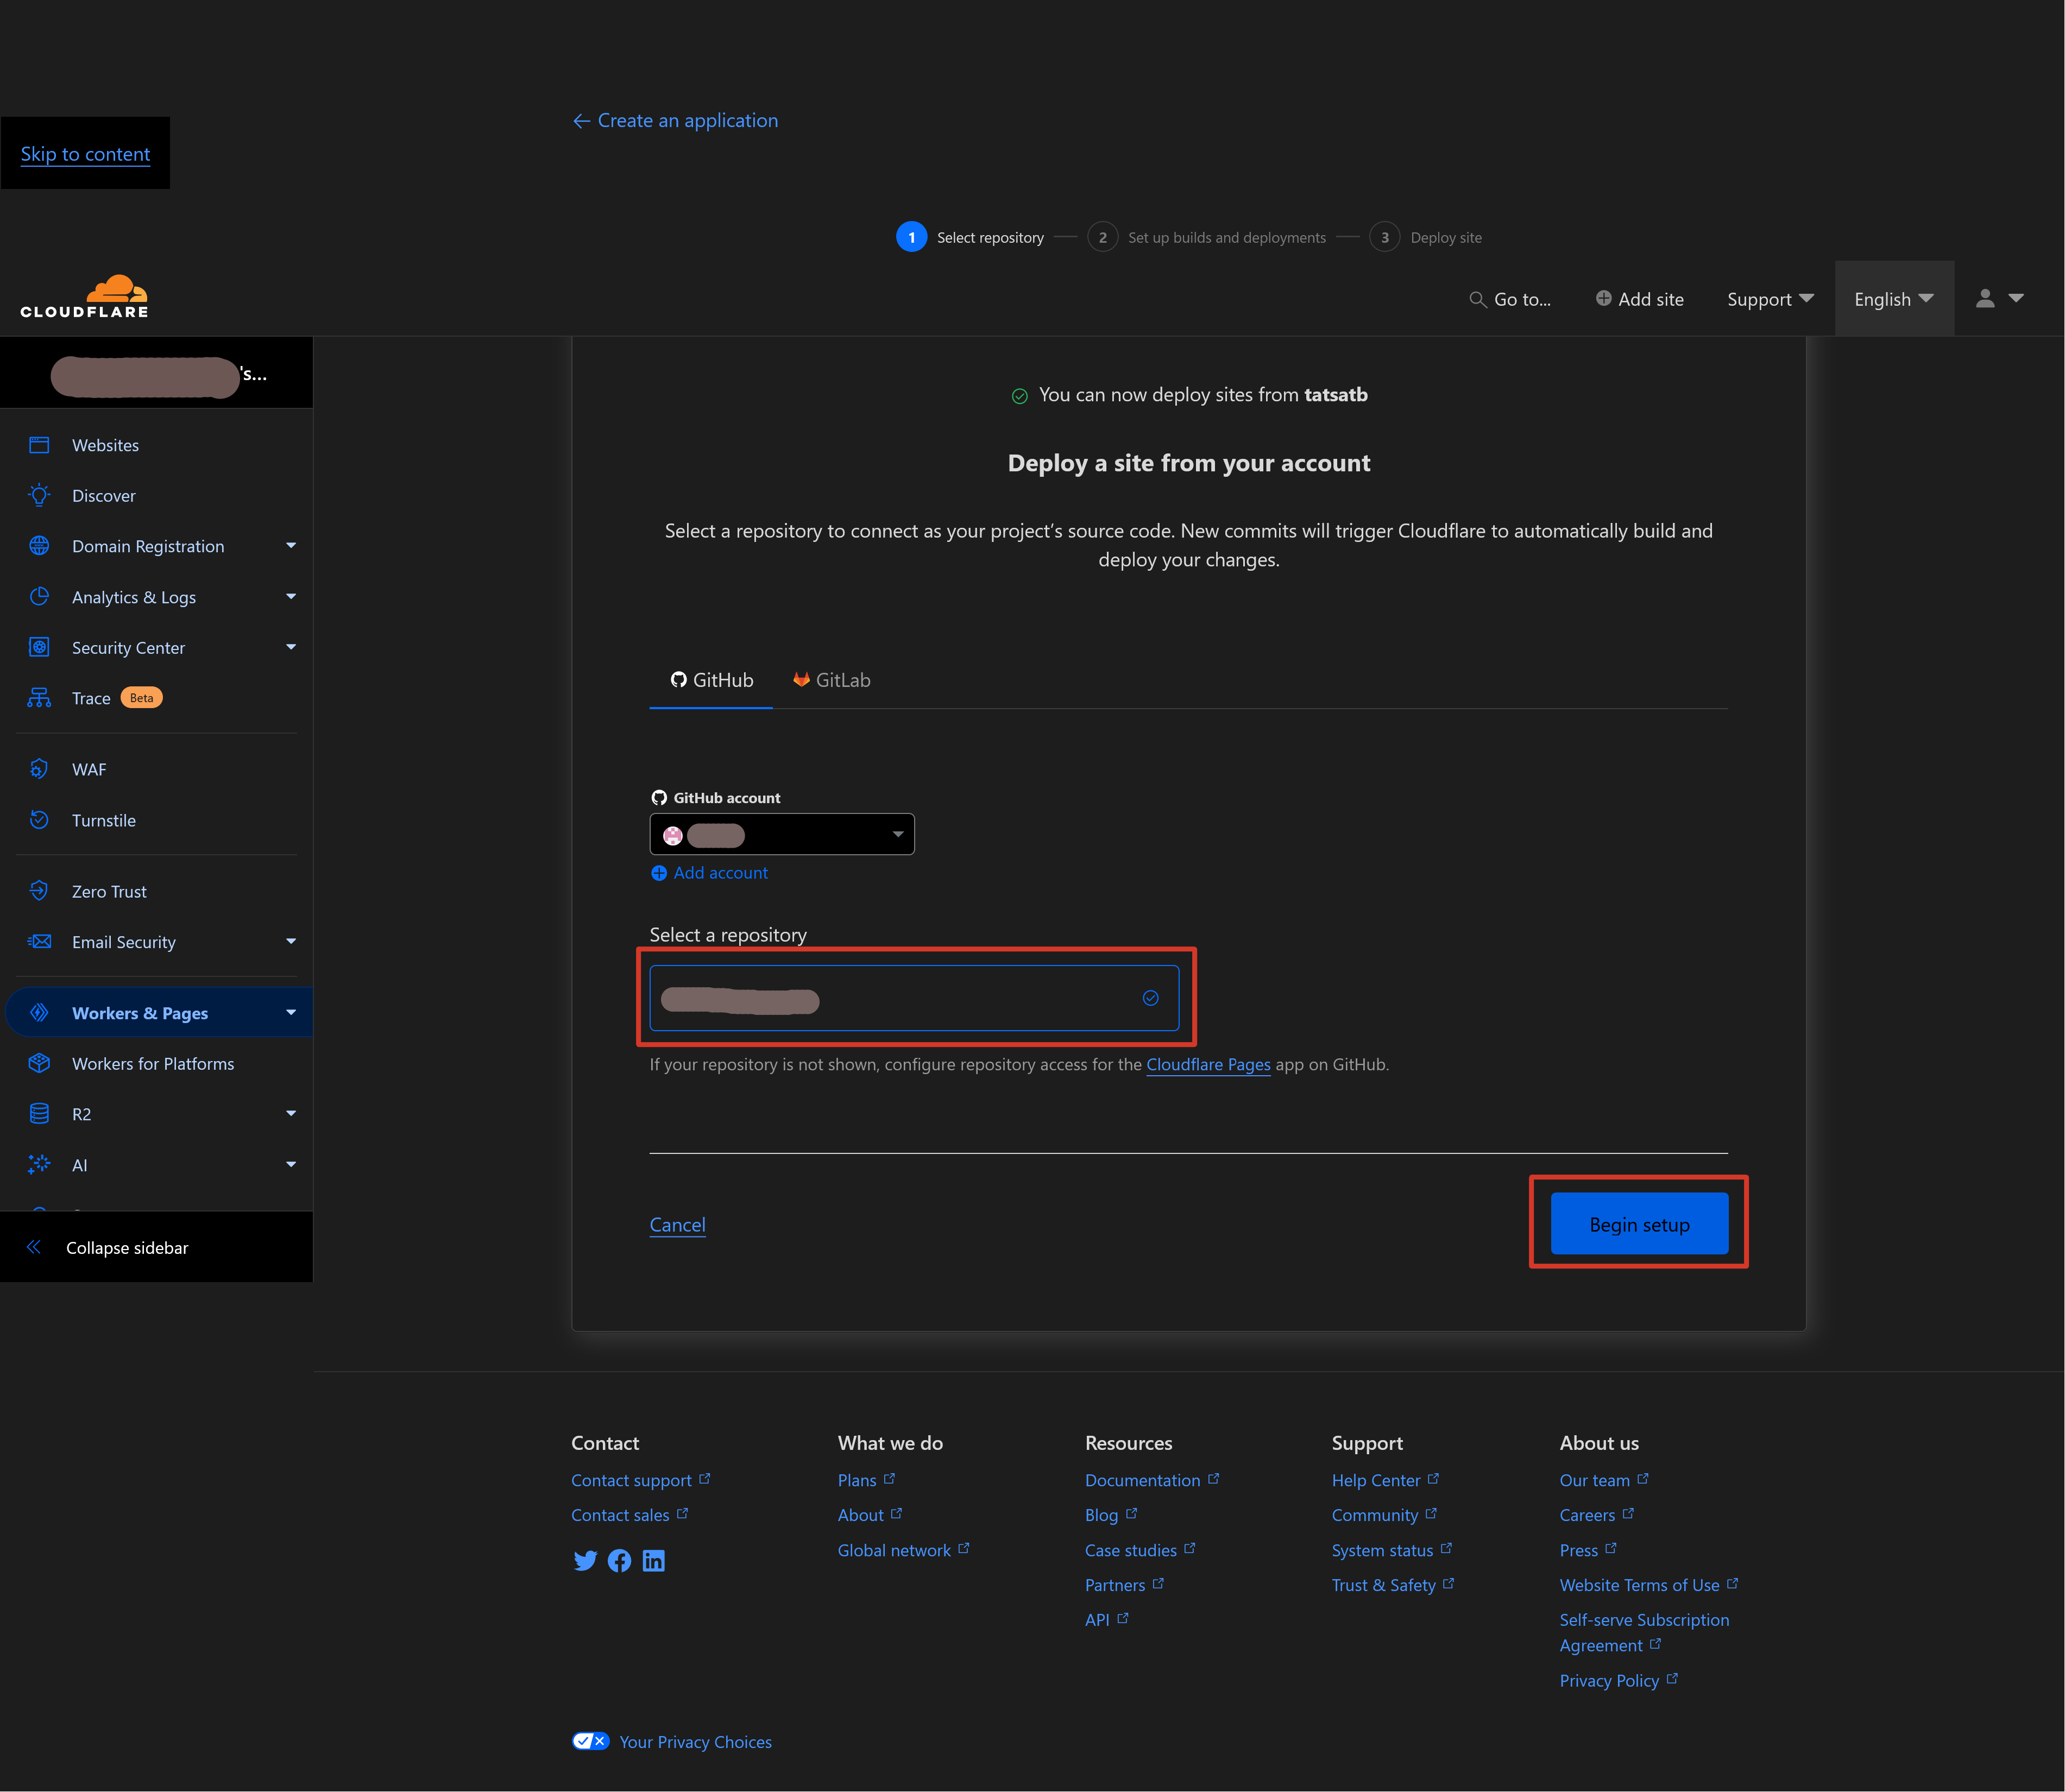
-
Once you see the following screen, select a Project name; your website will be available at mybestaticsite.pages.dev URL, if you select your Site name as mybestaticsite.
The build settings is the most important step. Insert the values that are shown in the figure below; i.e., select these exactly:
Production branch: main
Framework preset: None
Build command: bestatic
Build output directory: _output
Note: Although not needed (or recommended), but if you wish, you can use a specific version of Python, by selecting Environment variables (advanced) and setting the PYTHON_VERSION variable with the value of 3.10 (or something else).
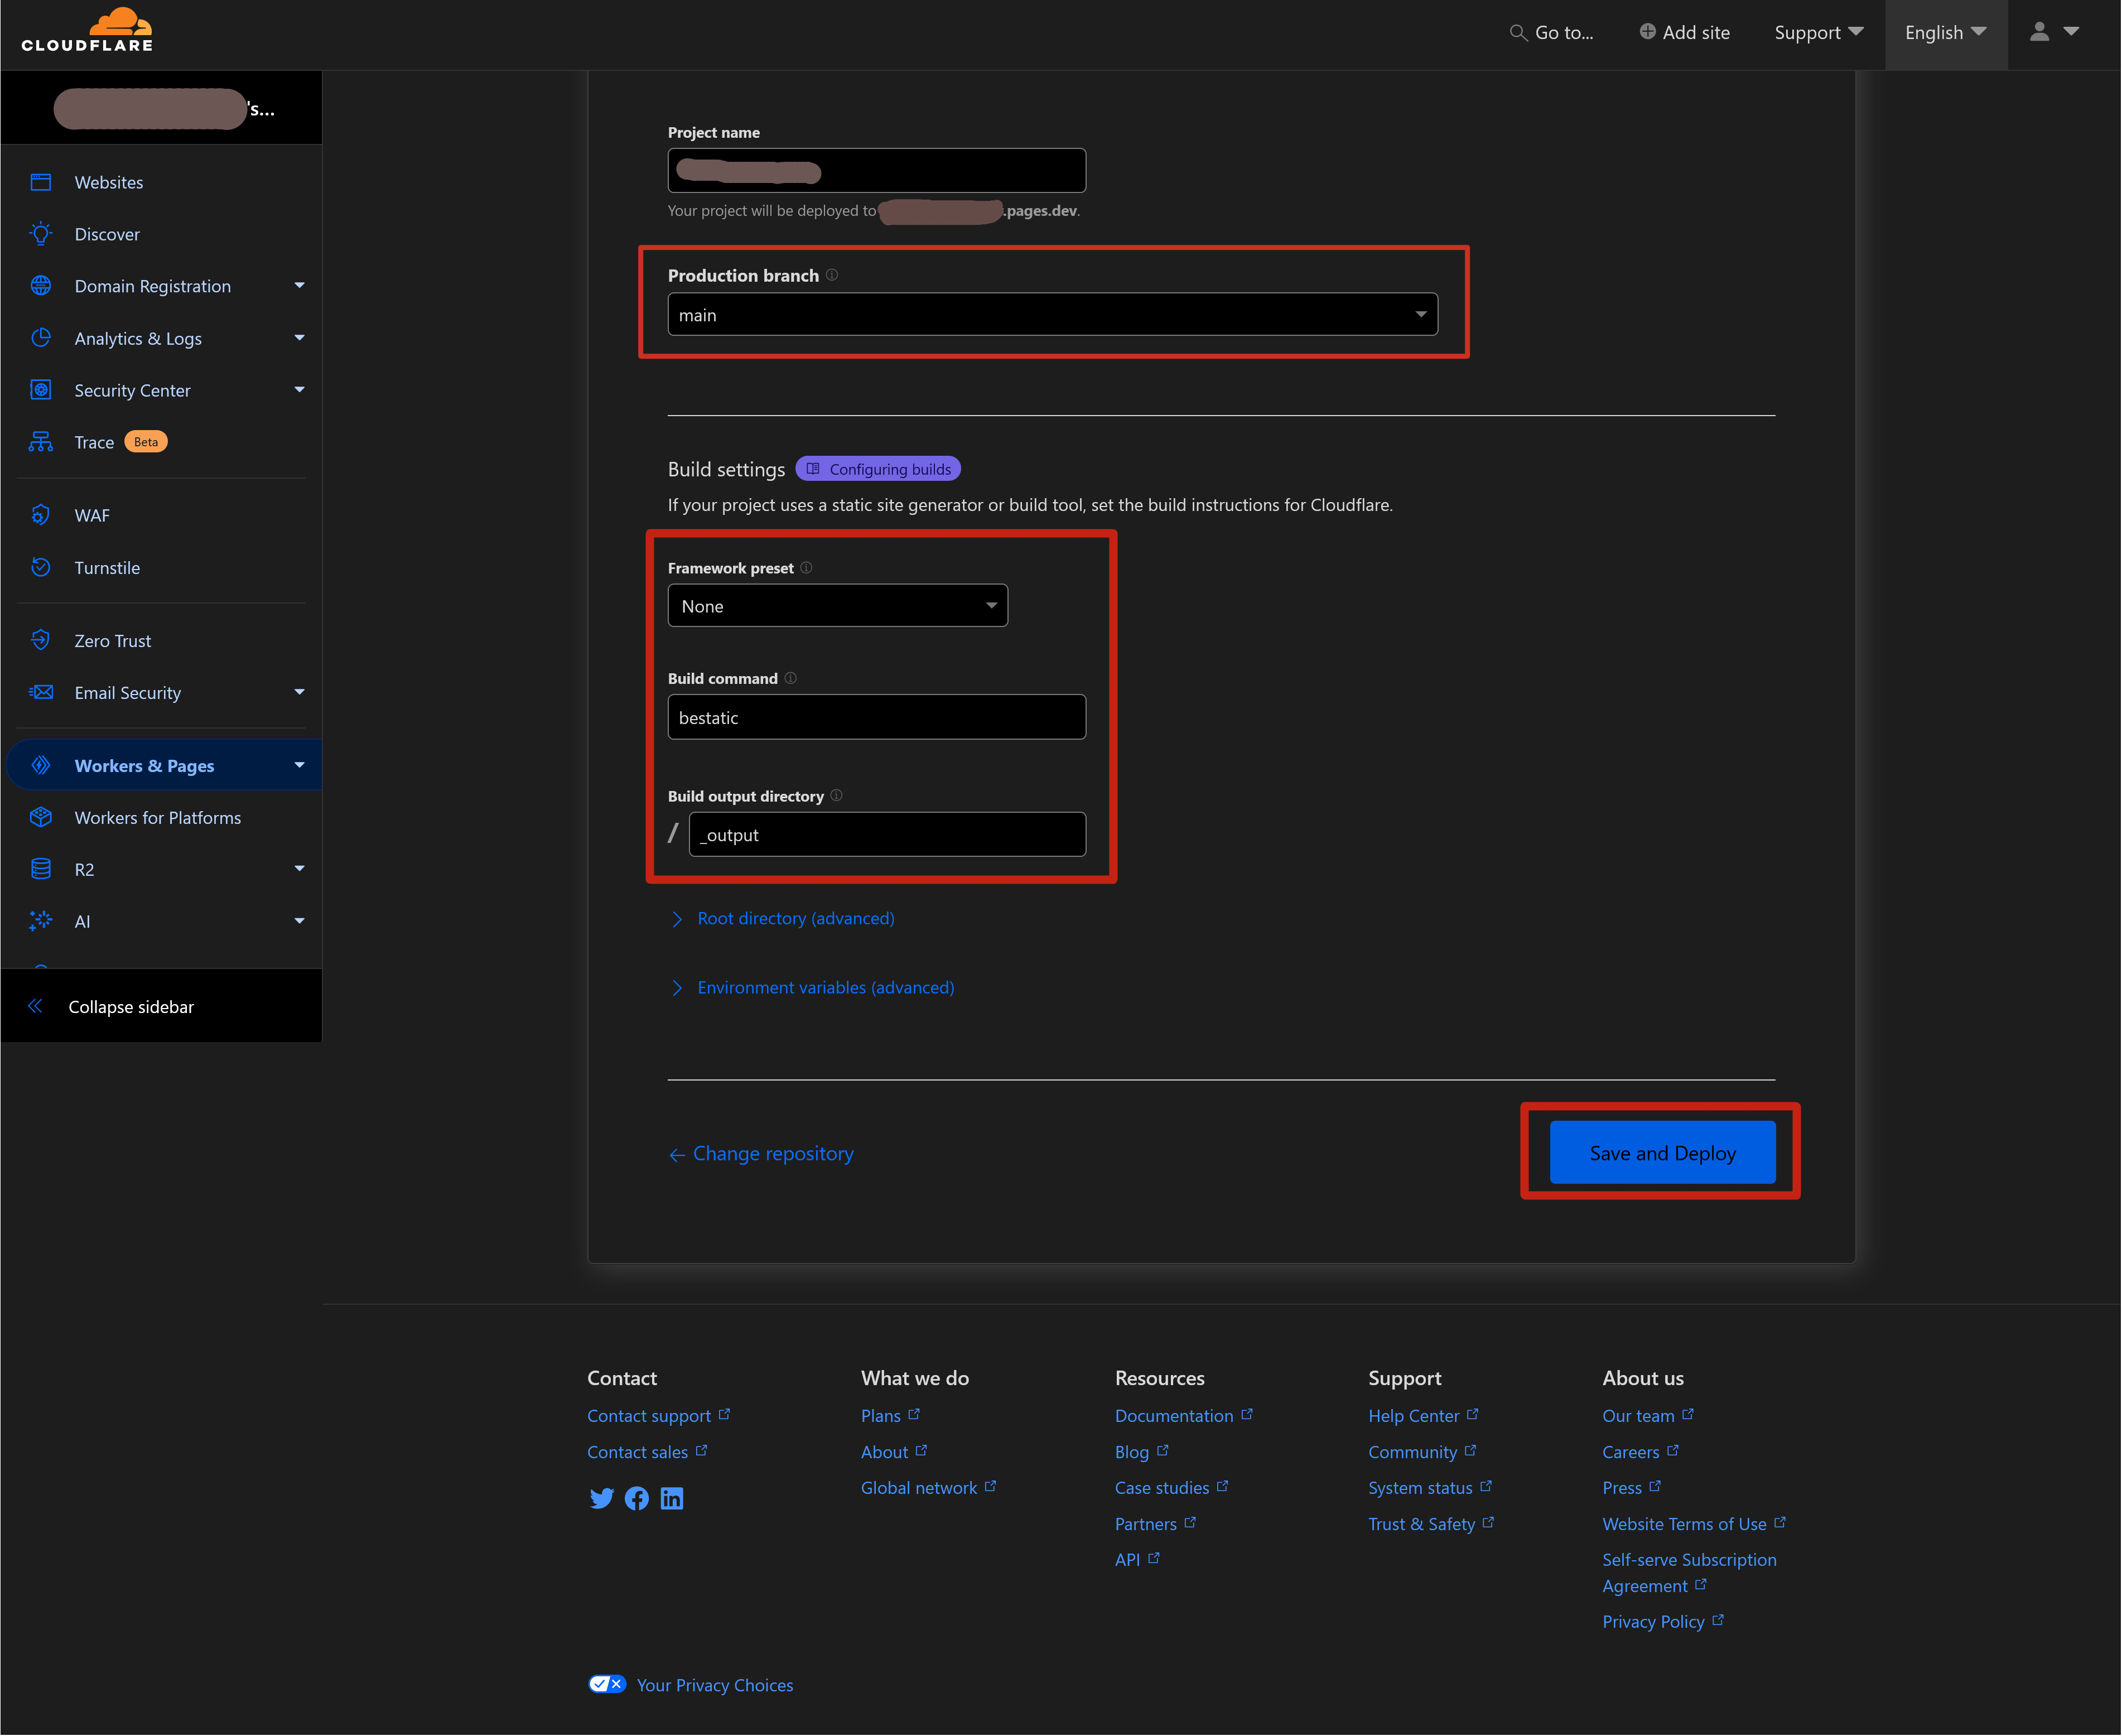
Once you have supplied correct build settings, Click on the Save and Deploy button at the bottom of the page and wait for the deployment to complete.
-
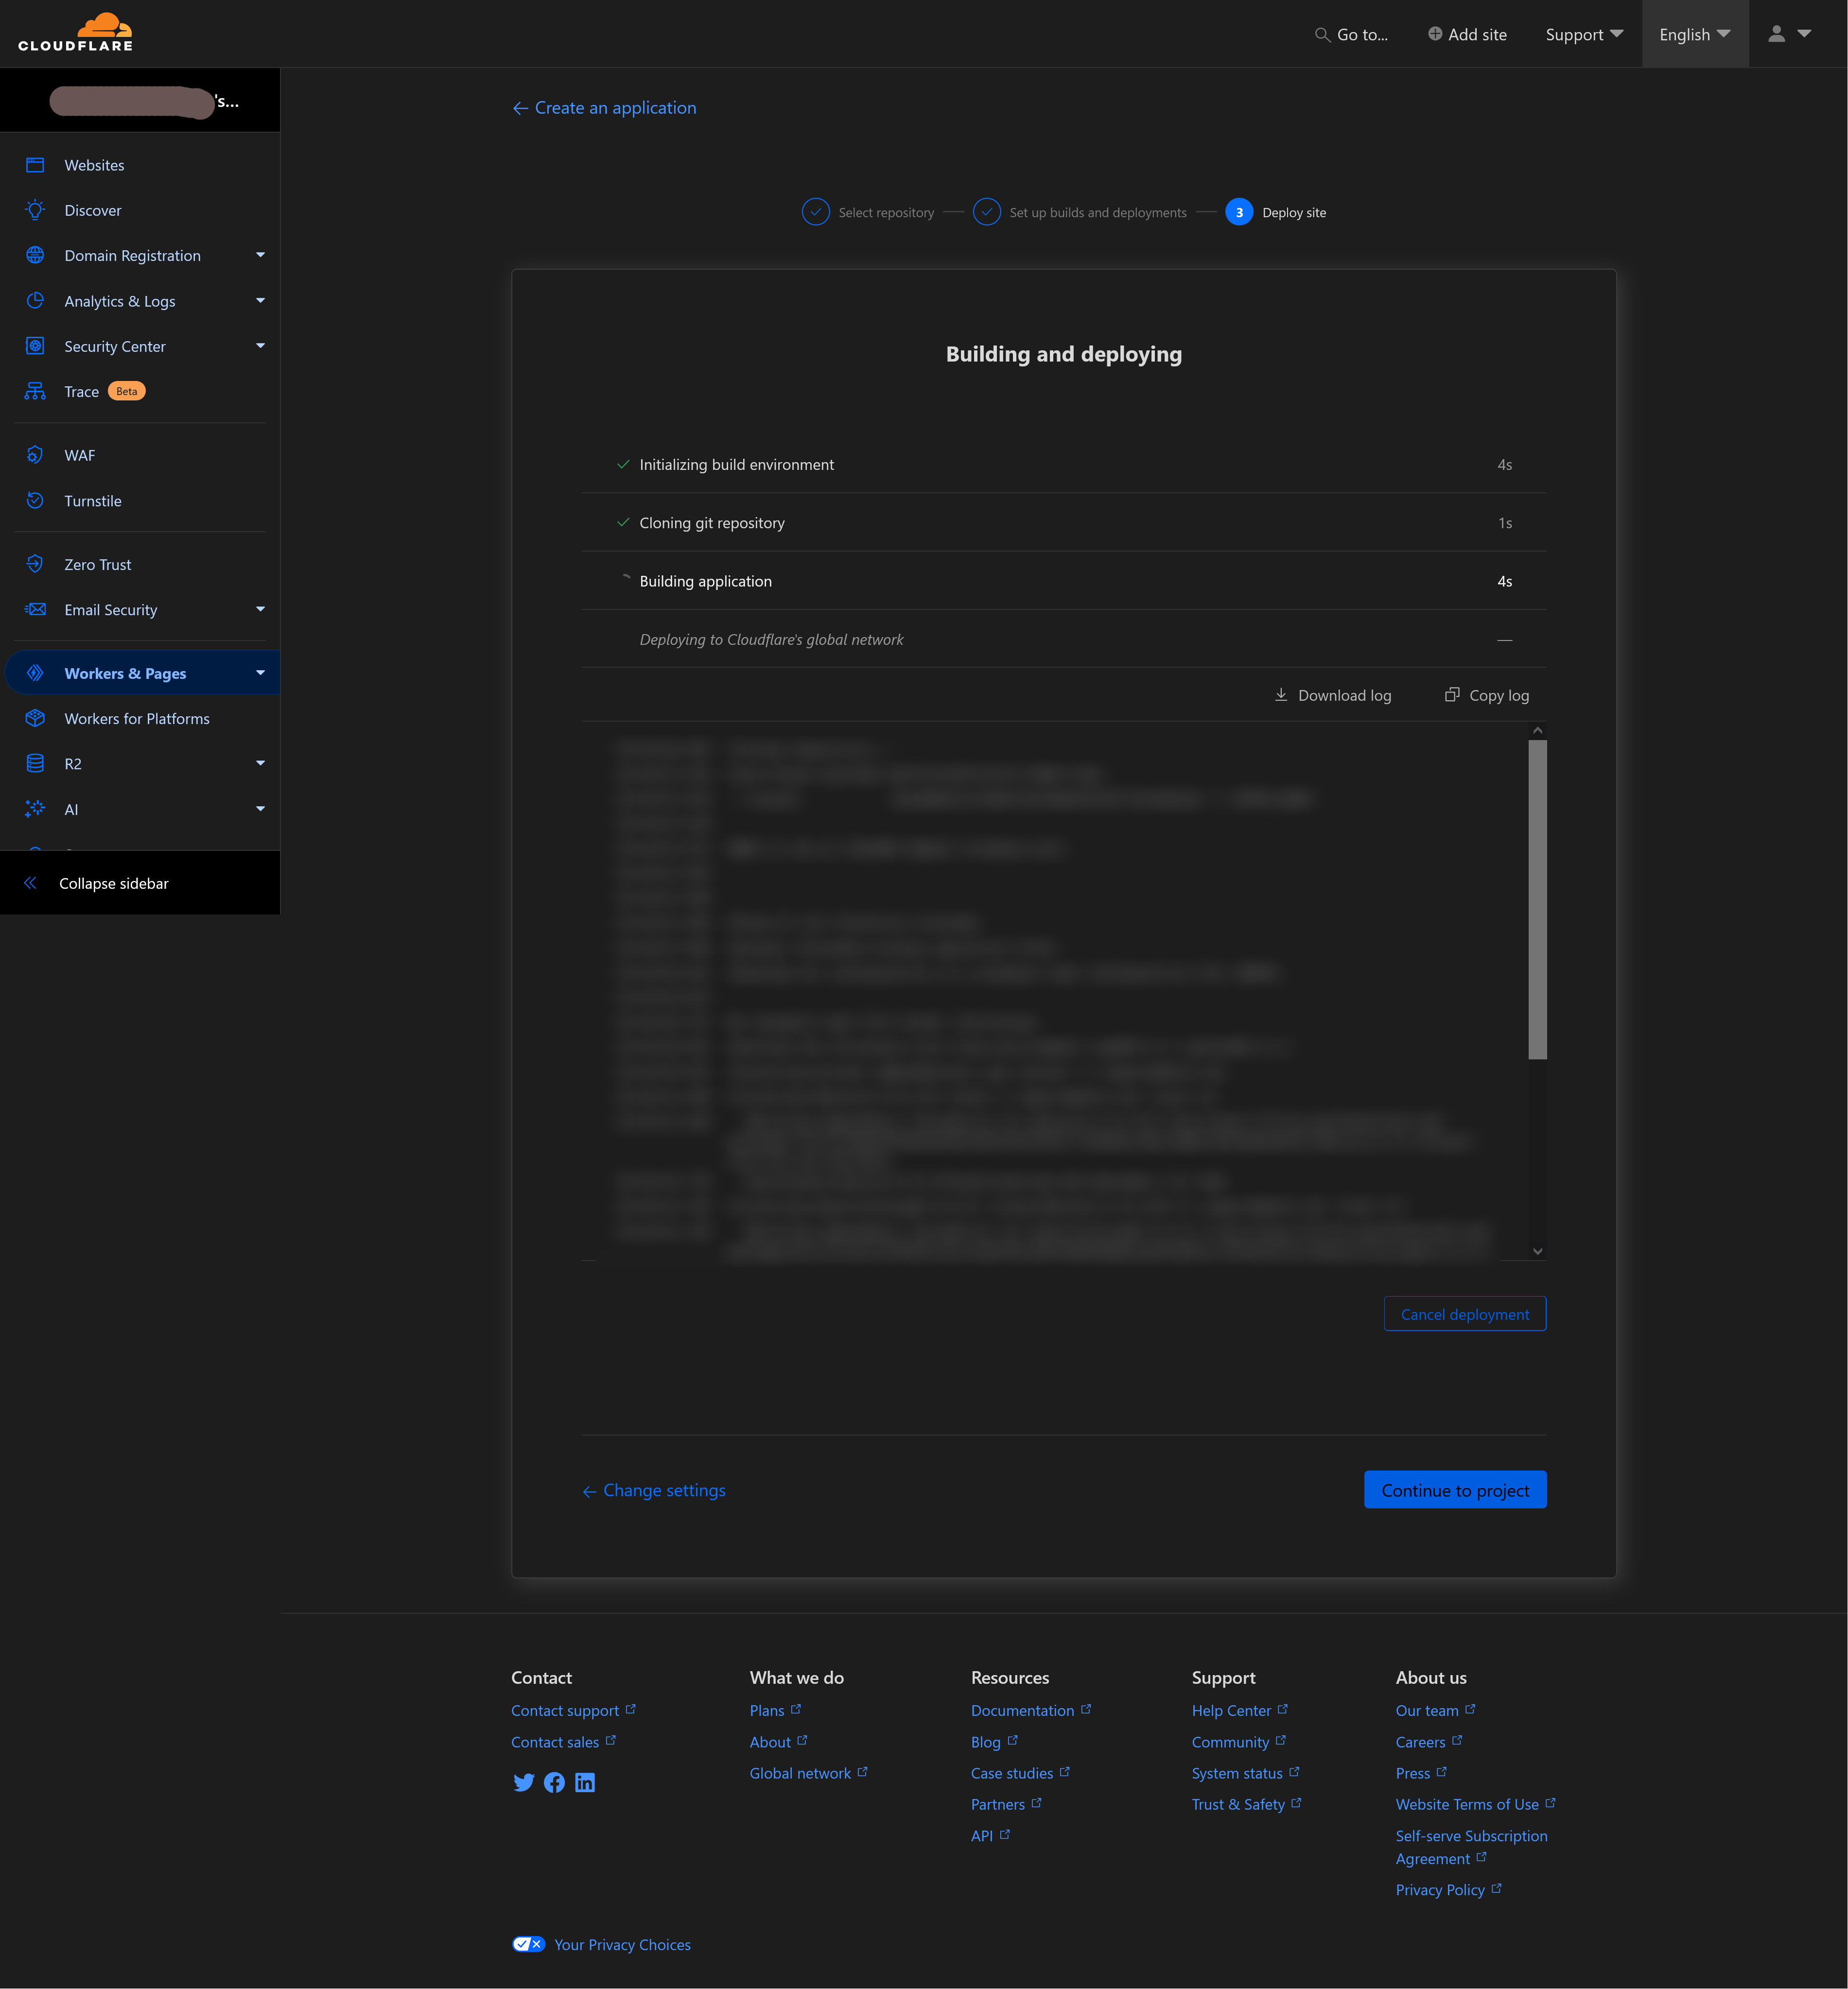
You should just wait for a minute or so when you see this screen:
-
If you are seeing this, that means you are done! Go to https://mybestaticsite.pages.dev to view your website.
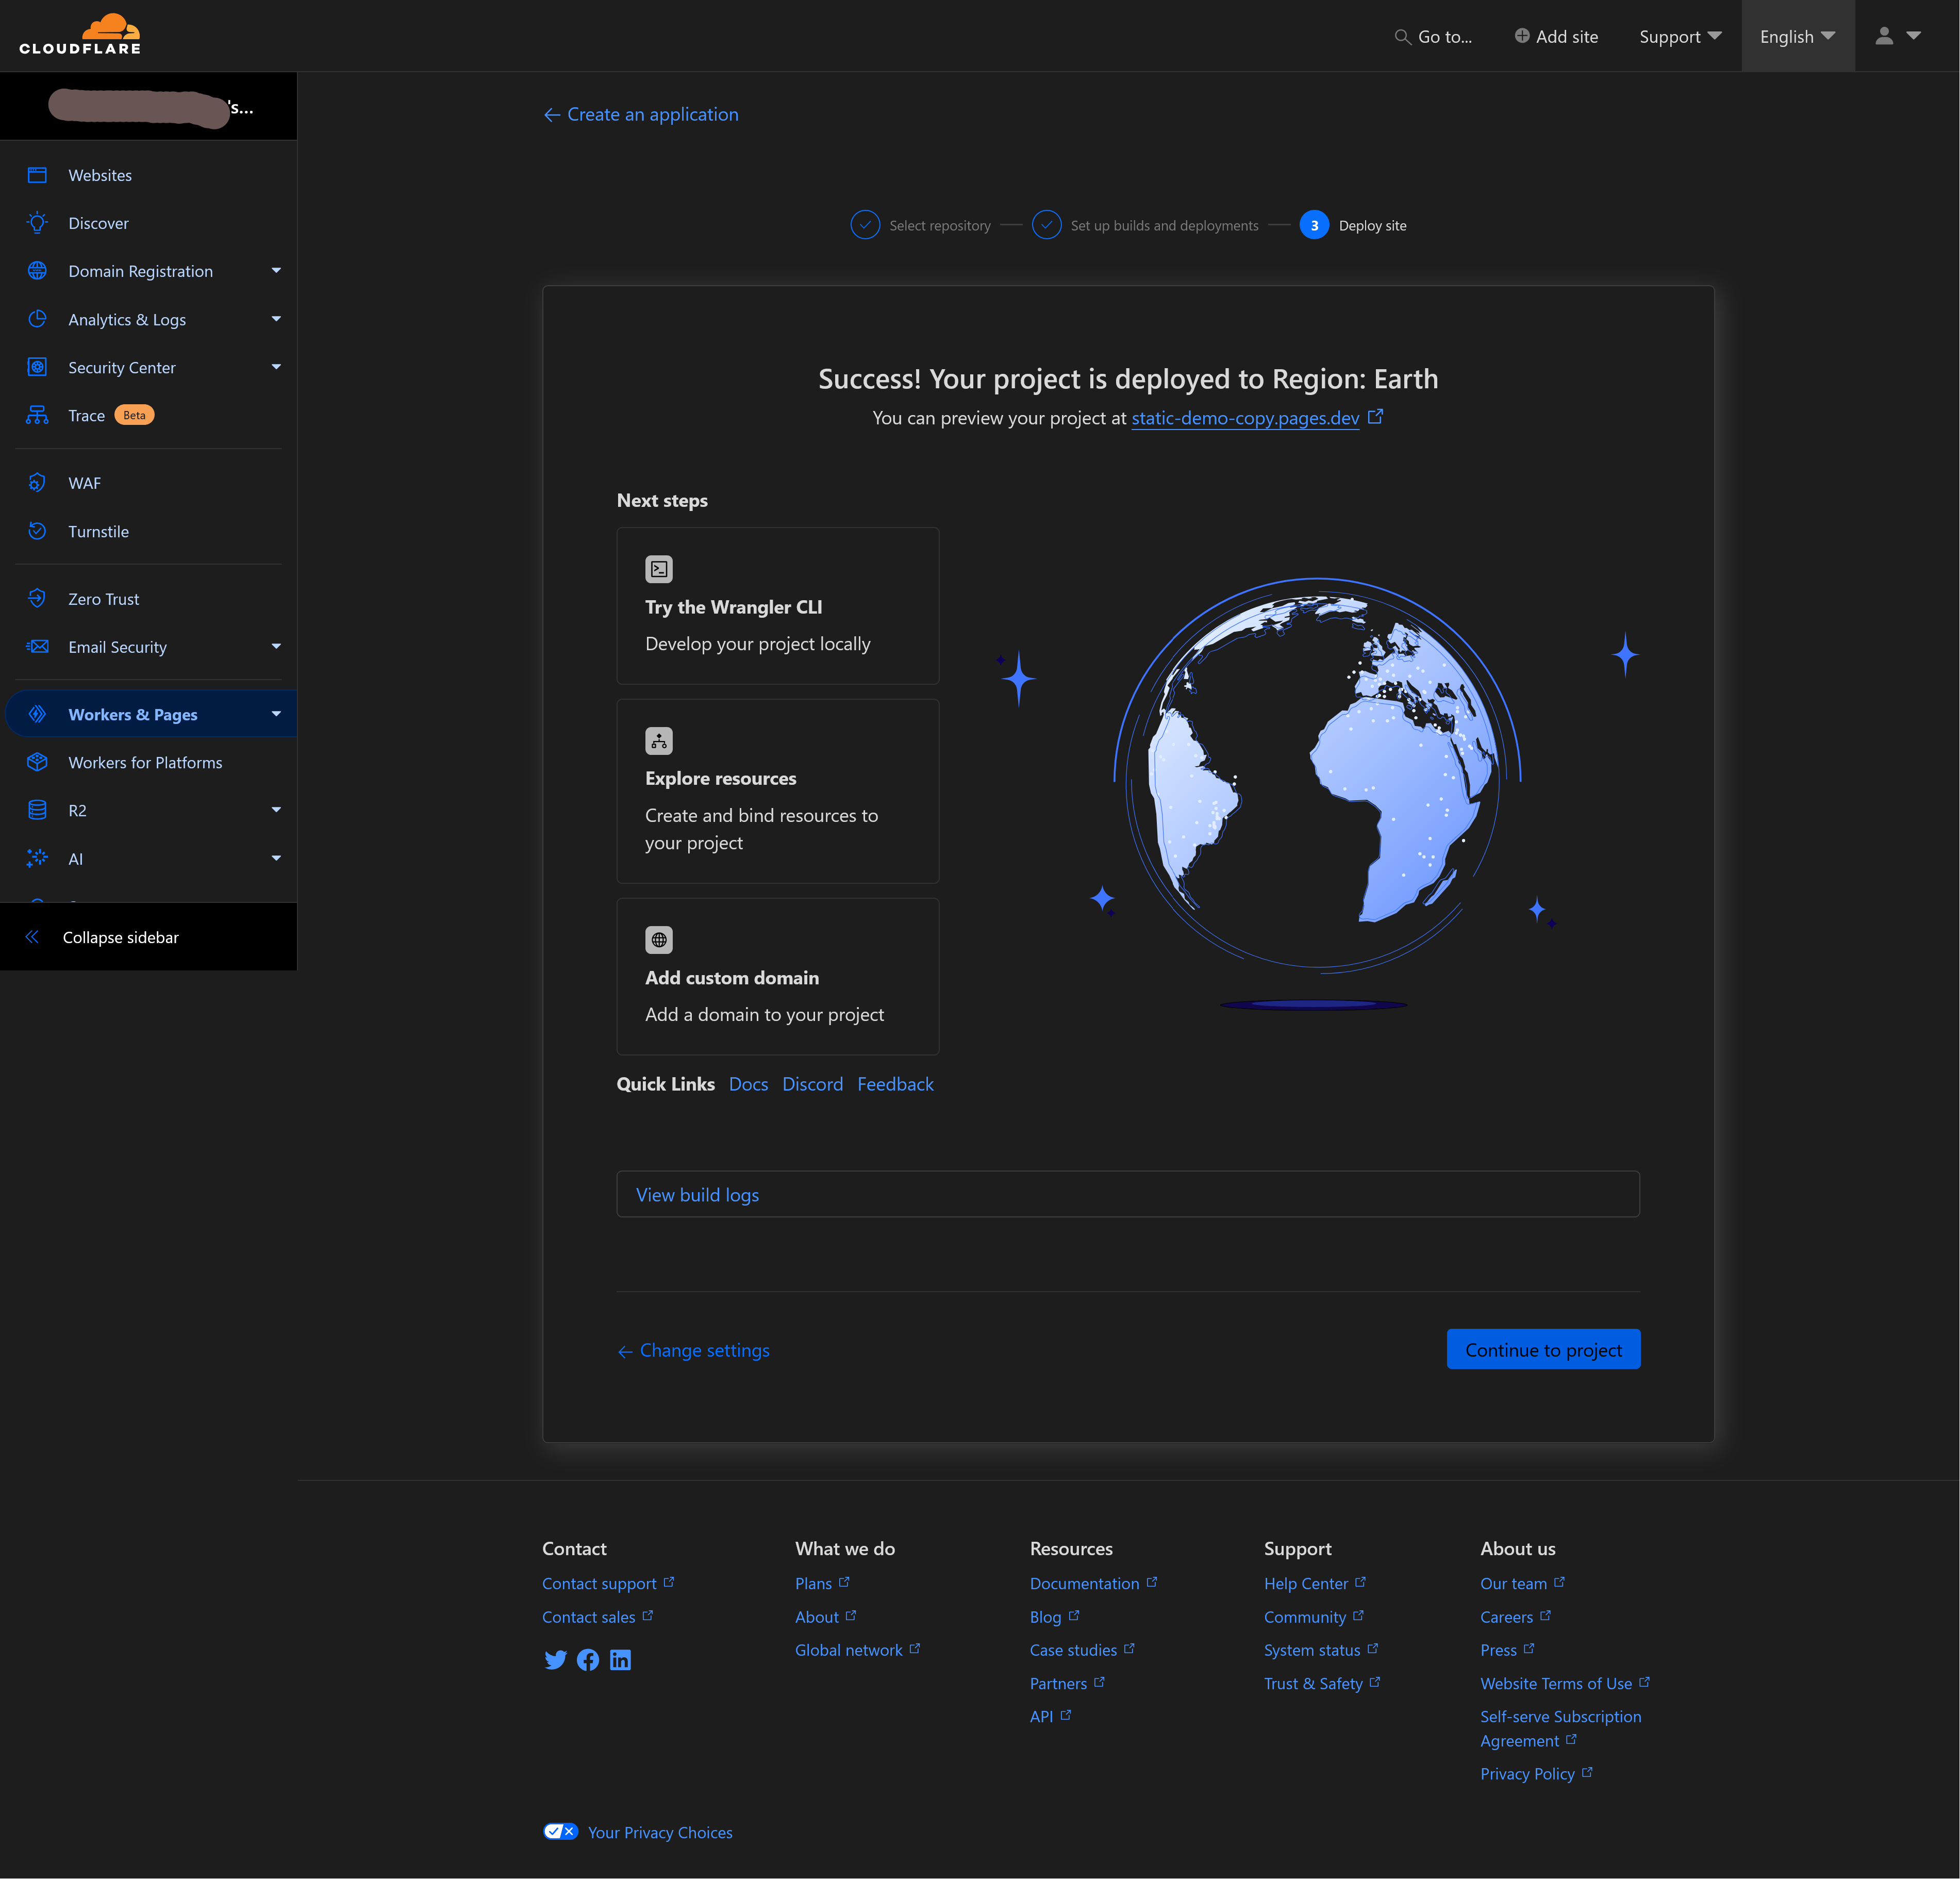
Now, every time you push a change to your GitHub repo, Cloudflare will automatically detect it, rebuild your website, and deploy it to the same URL. If you want to use custom domains and automated HTTPS, you can do so for free. Cloudflare offer a robust domain registration, domain management services, and SSL certificate management for free: Visit this page to get started with those.
Netlify
Netlify, almost like Cloudflare pages, provides continuous deployment, a global CDN, full DNS, automated HTTPS, and a bunch of other cool stuff, with a pretty generous free tier.
We are assuming you at least completed the Quickstart and gone through the introduction above to host your files on GitHub. The procedure will be essentially the same, even if you are using GitLab or Bitbucket to host your files.
Now, the following procedure will enable continuous deployment from a GitHub repository (i.e., whenever you push a change to your GitHub repo, Netlify will automatically rebuild and deploy your site).
-
Sign up for a Netlify account.
-
Add a requirements.txt file to the root location of your GitHub repo. That file should have this line (include the latest version of Bestatic after == sign):
1Bestatic==0.0.28 -
From the Netlify dashboard (https://app.netlify.com/teams/<teamname>/sites), click on Add new site > Import an existing project, as shown below.

-
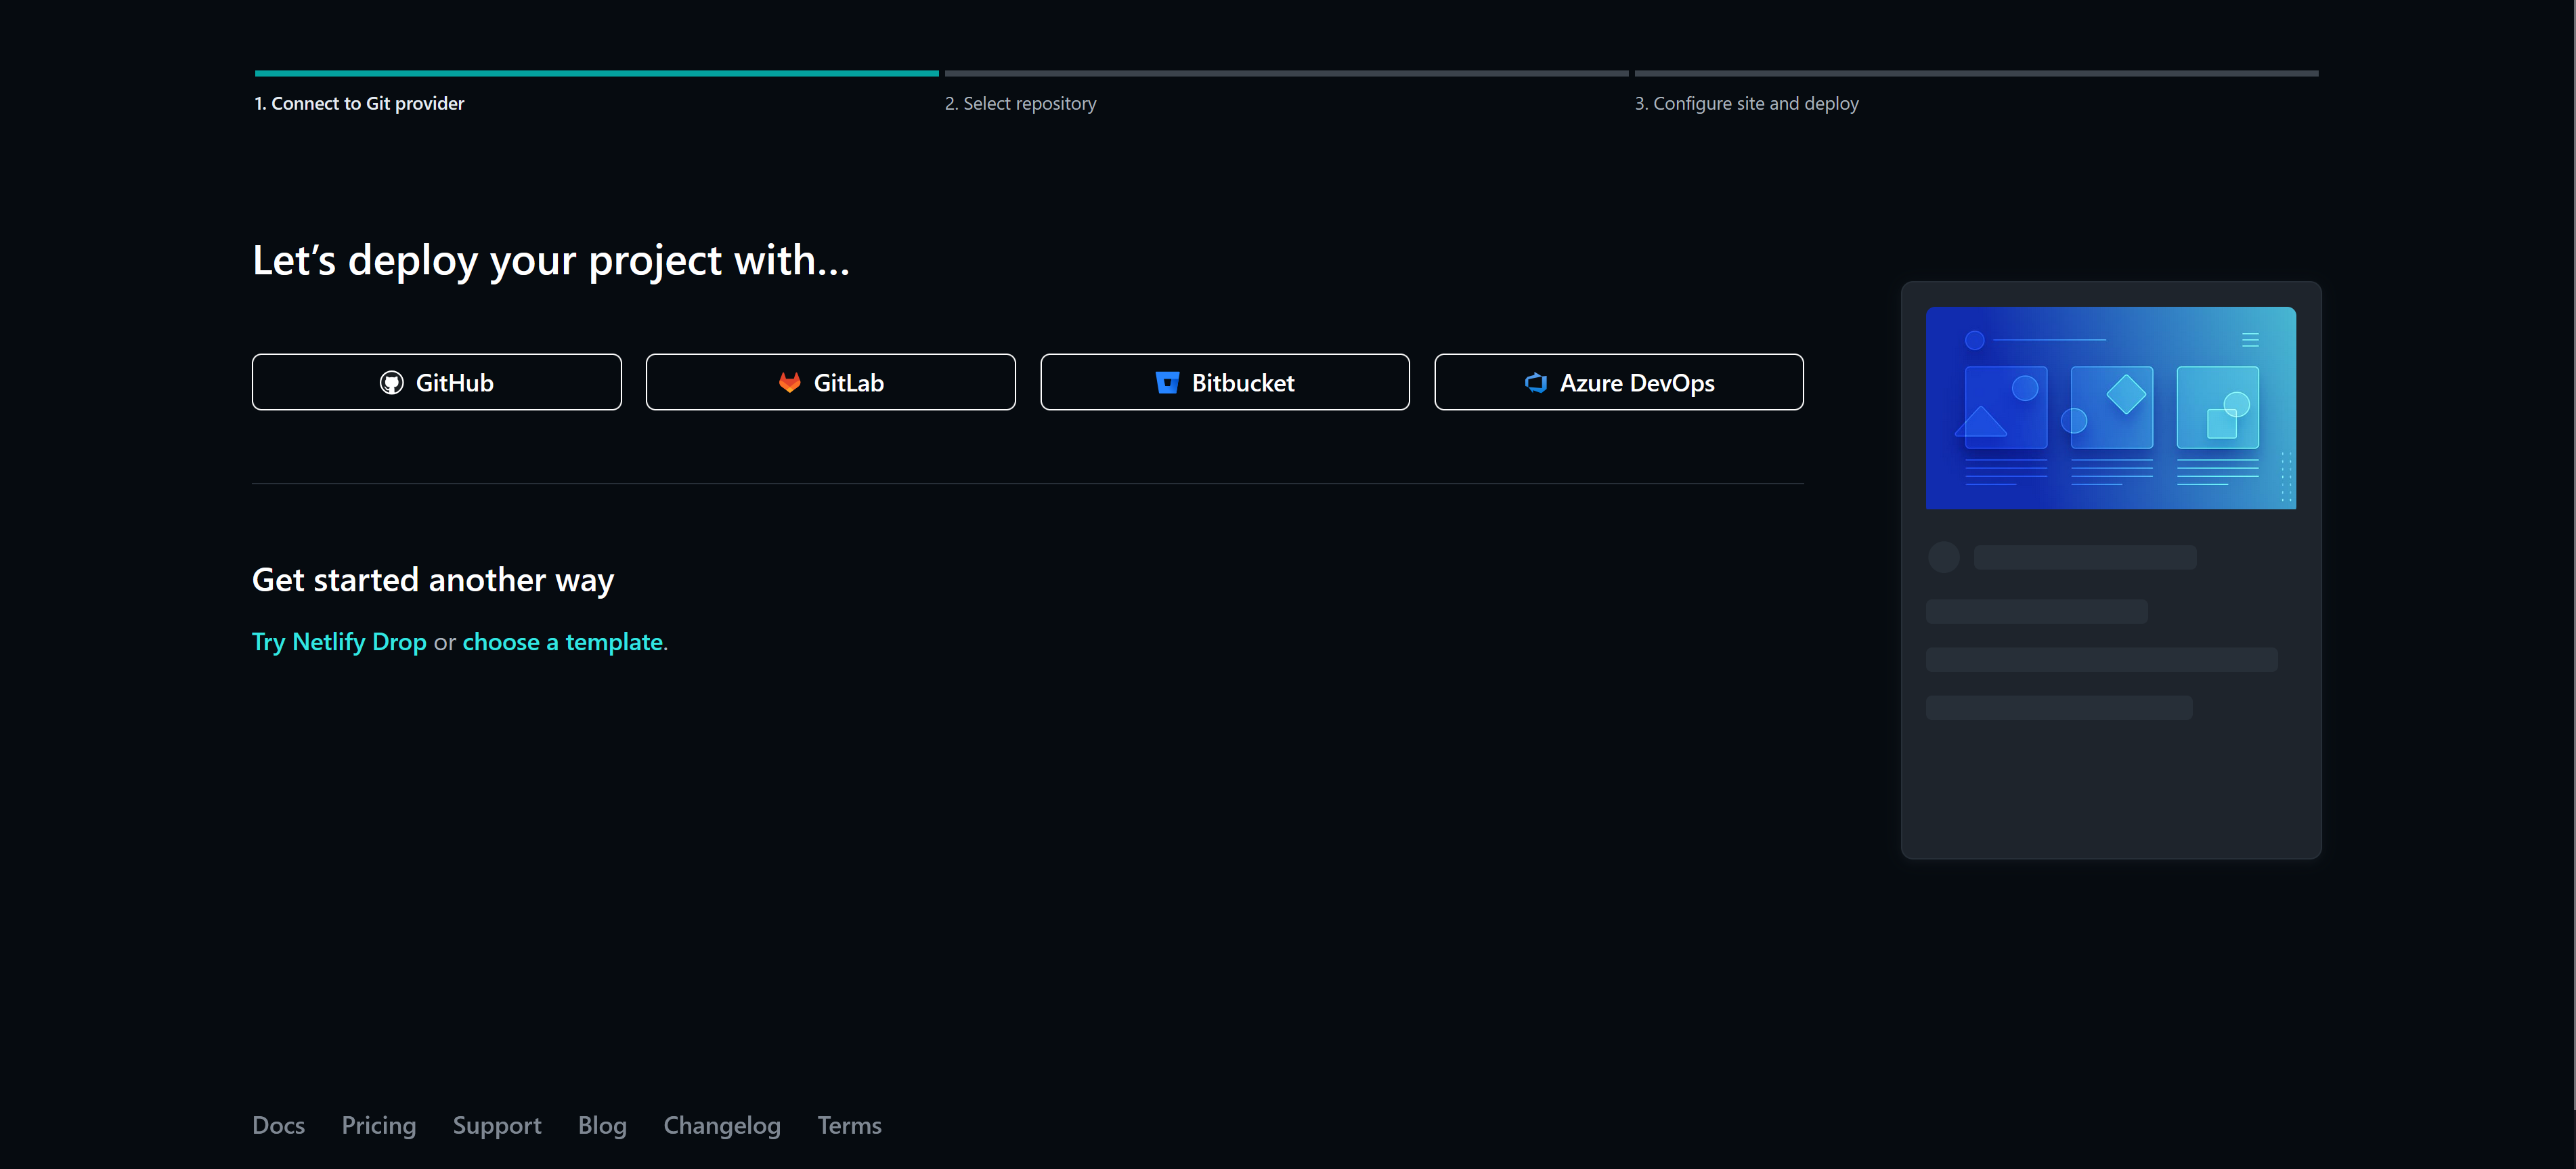
Then click on GitHub button below (or other providers, if you are hosting your files with them).
-
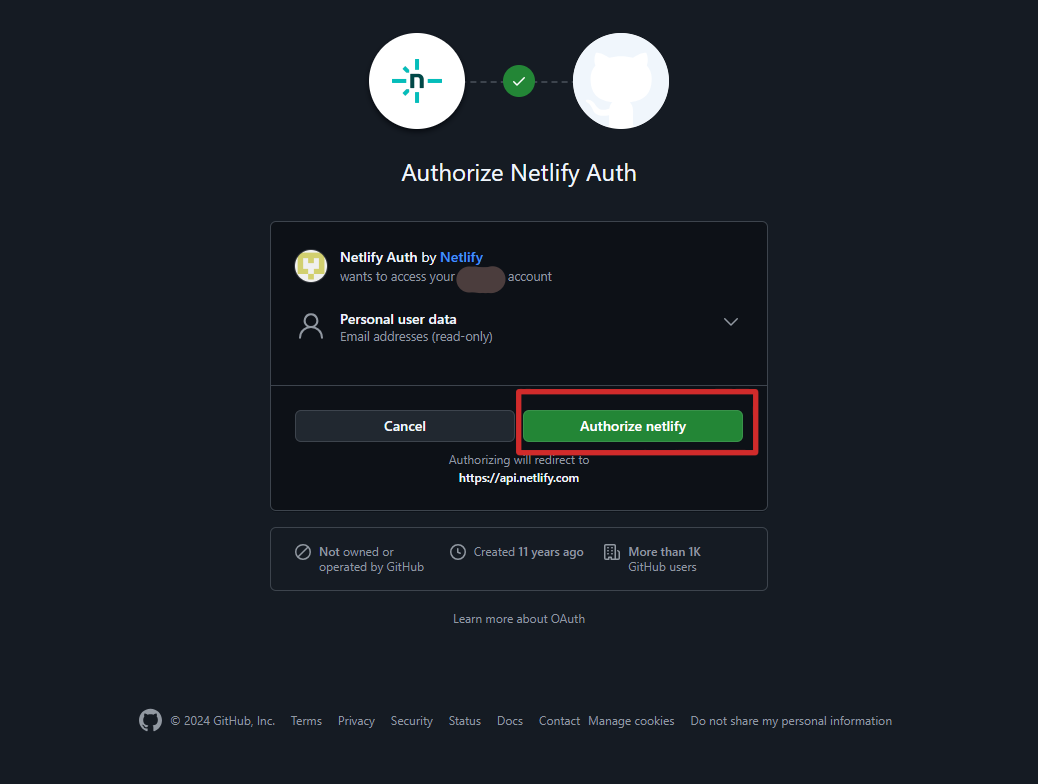
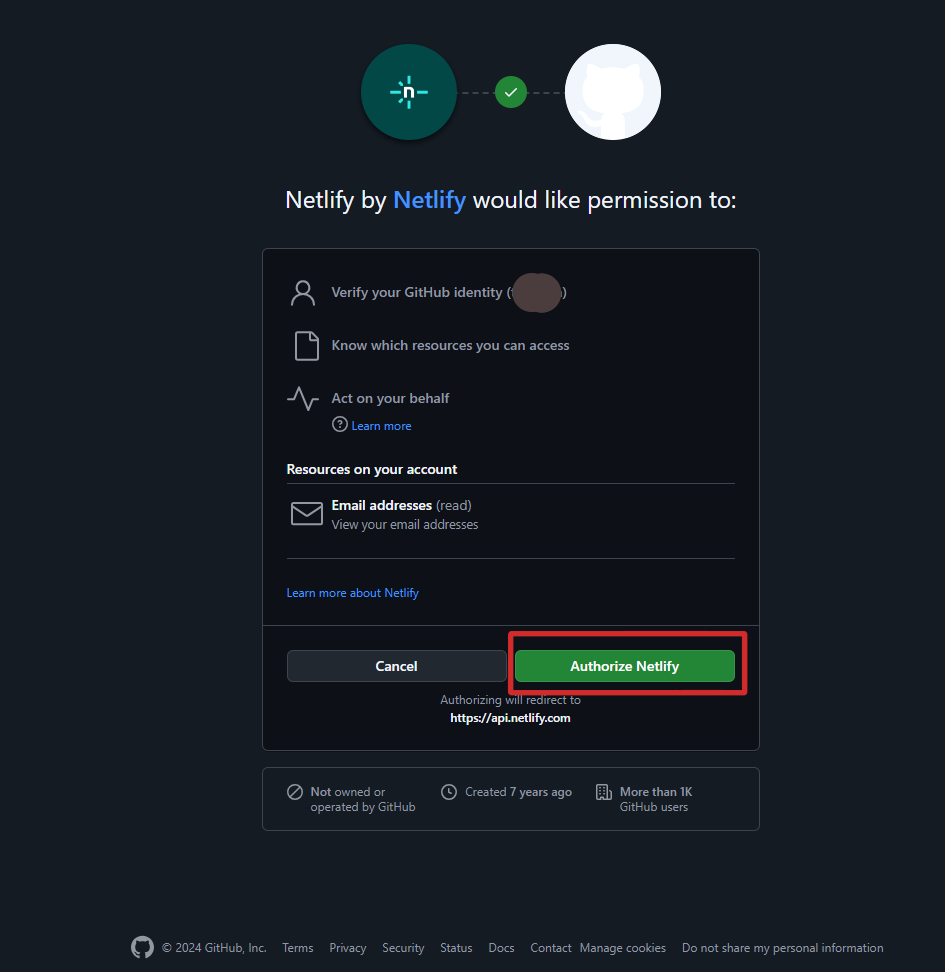
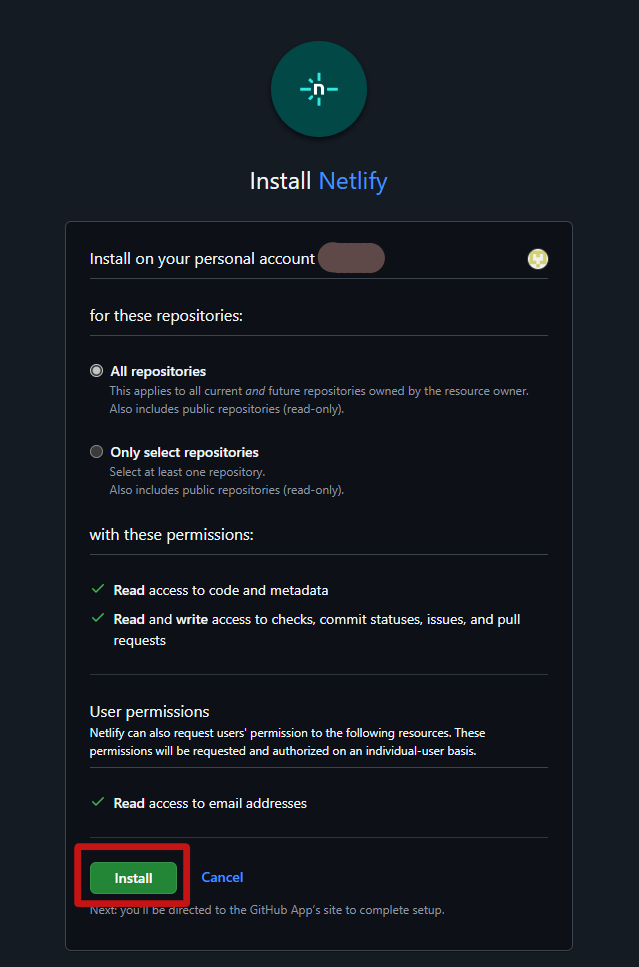
If a pop-up appears from GitHub, asking you to authorize Netlify, do so by clicking the "Authorize Netlify" button. You may also be asked to install netlify on your GitHub repos. If you see one of these screens, please select "Authorize netlify" and "Install" buttons.
-
Once you have done this, come back to Netlify website. You should see the following page where you should search for your repo that contains your website. Once you see your repo, you should click on the arrow (box no. 2).
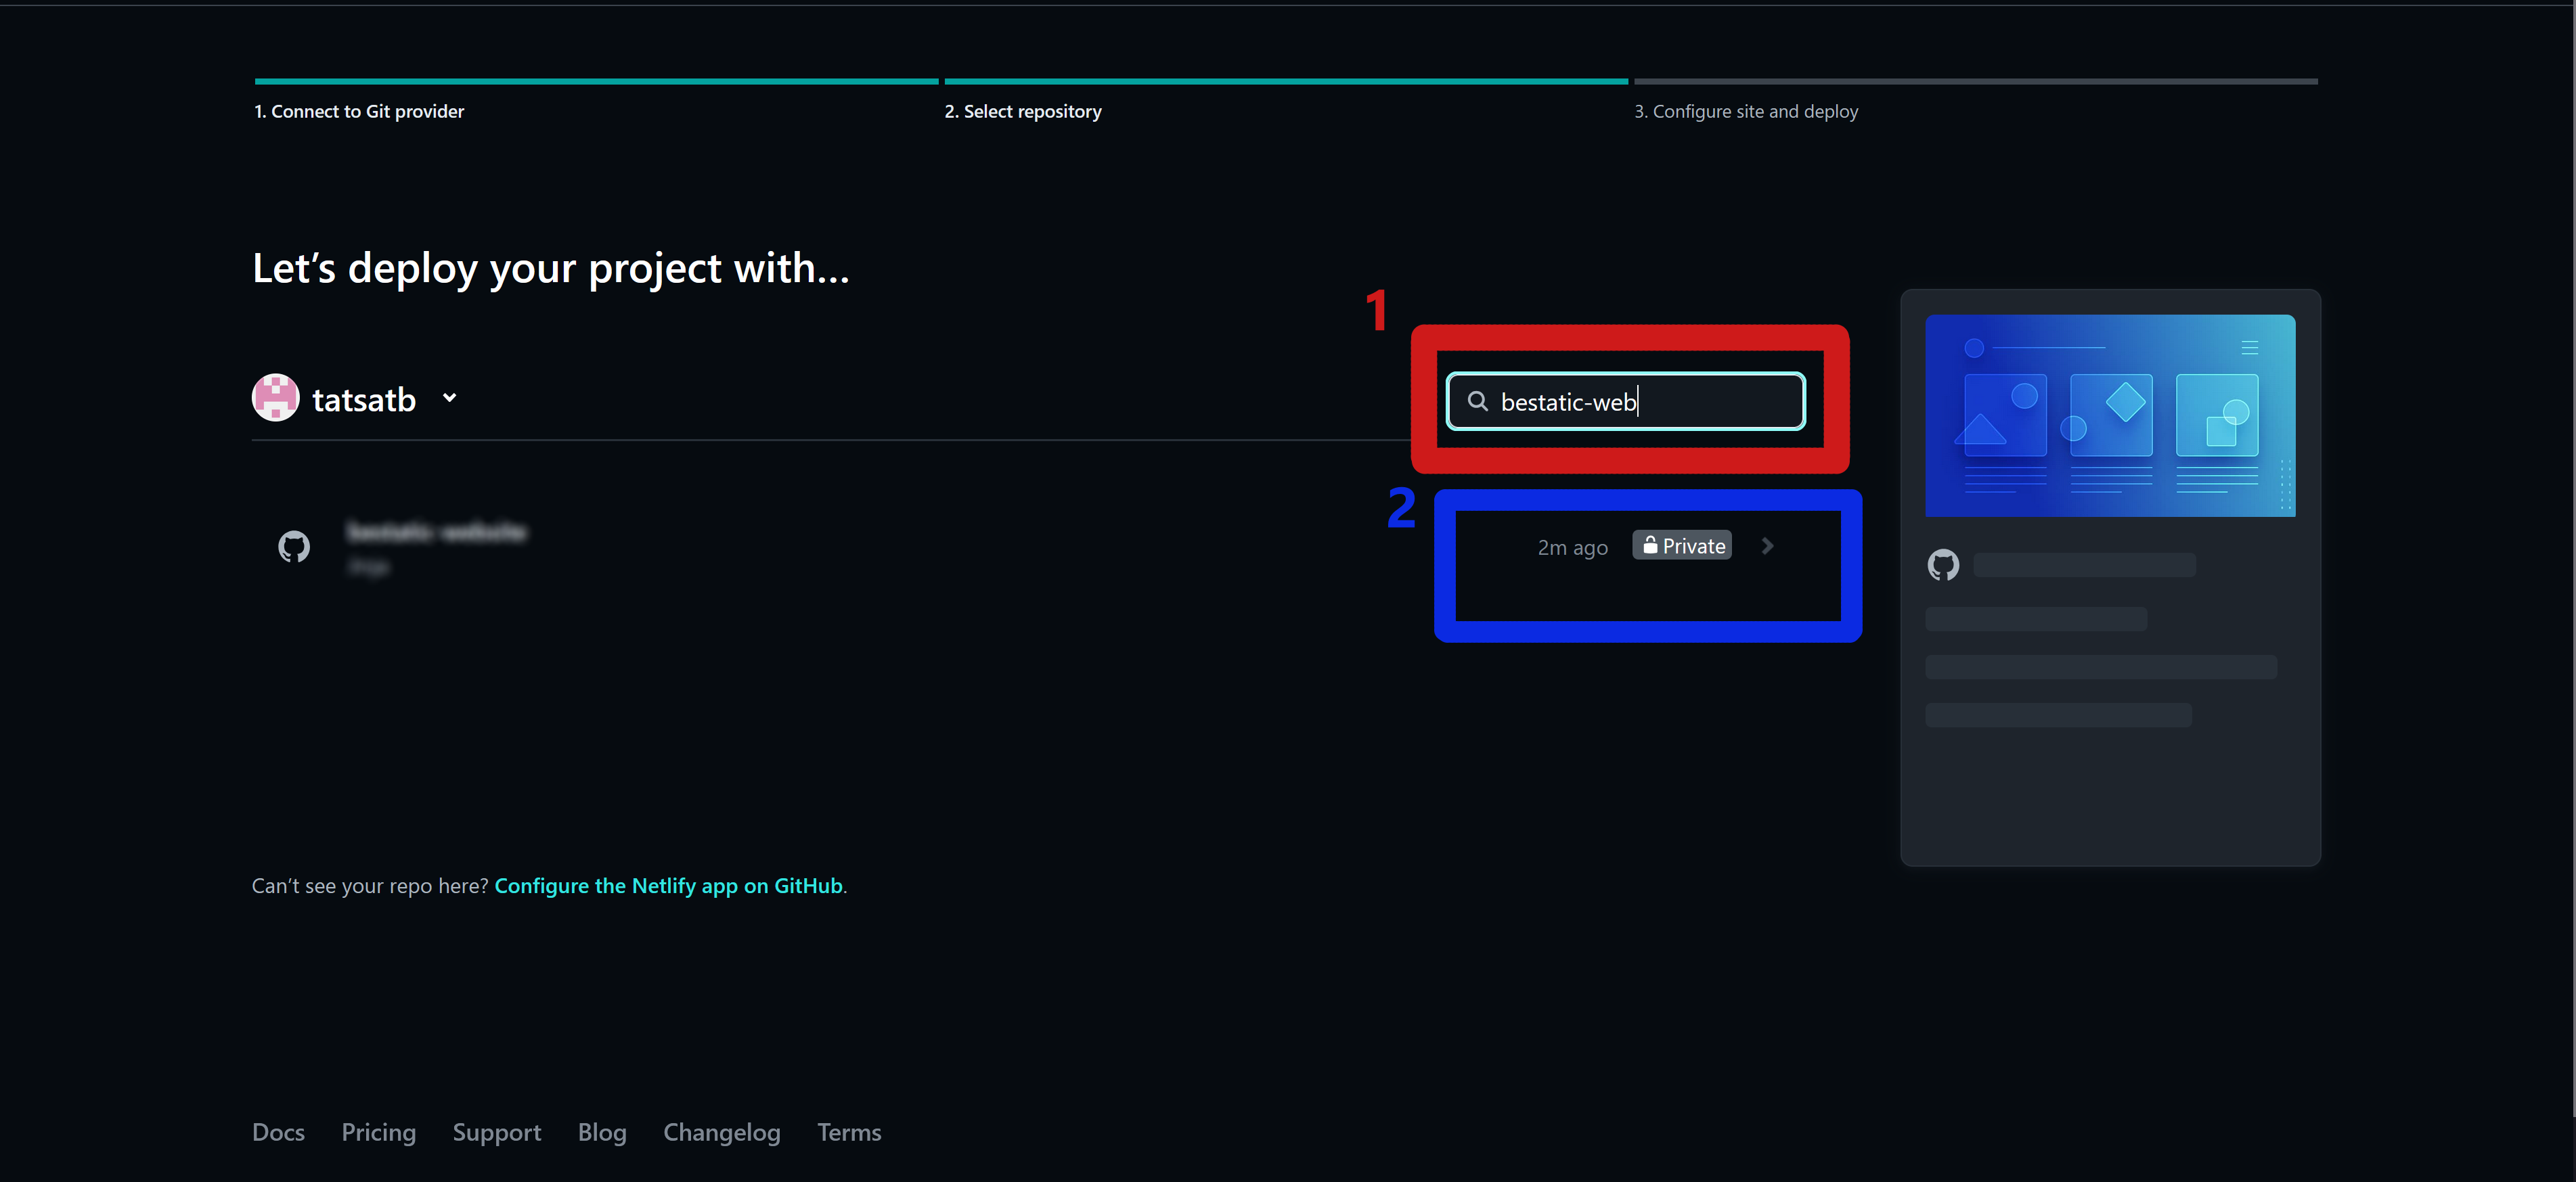
-
Once you see the following screen, select a site name; your website will be available at mybestaticsite.netlify.app URL, if you select your Site name as mybestaticsite.
The build settings is the most important step. Insert the values that are shown in the figure below; i.e., select these exactly:
Branch to deploy: main
Base directory: (keep empty)
Build command: bestatic
Publish directory: _output
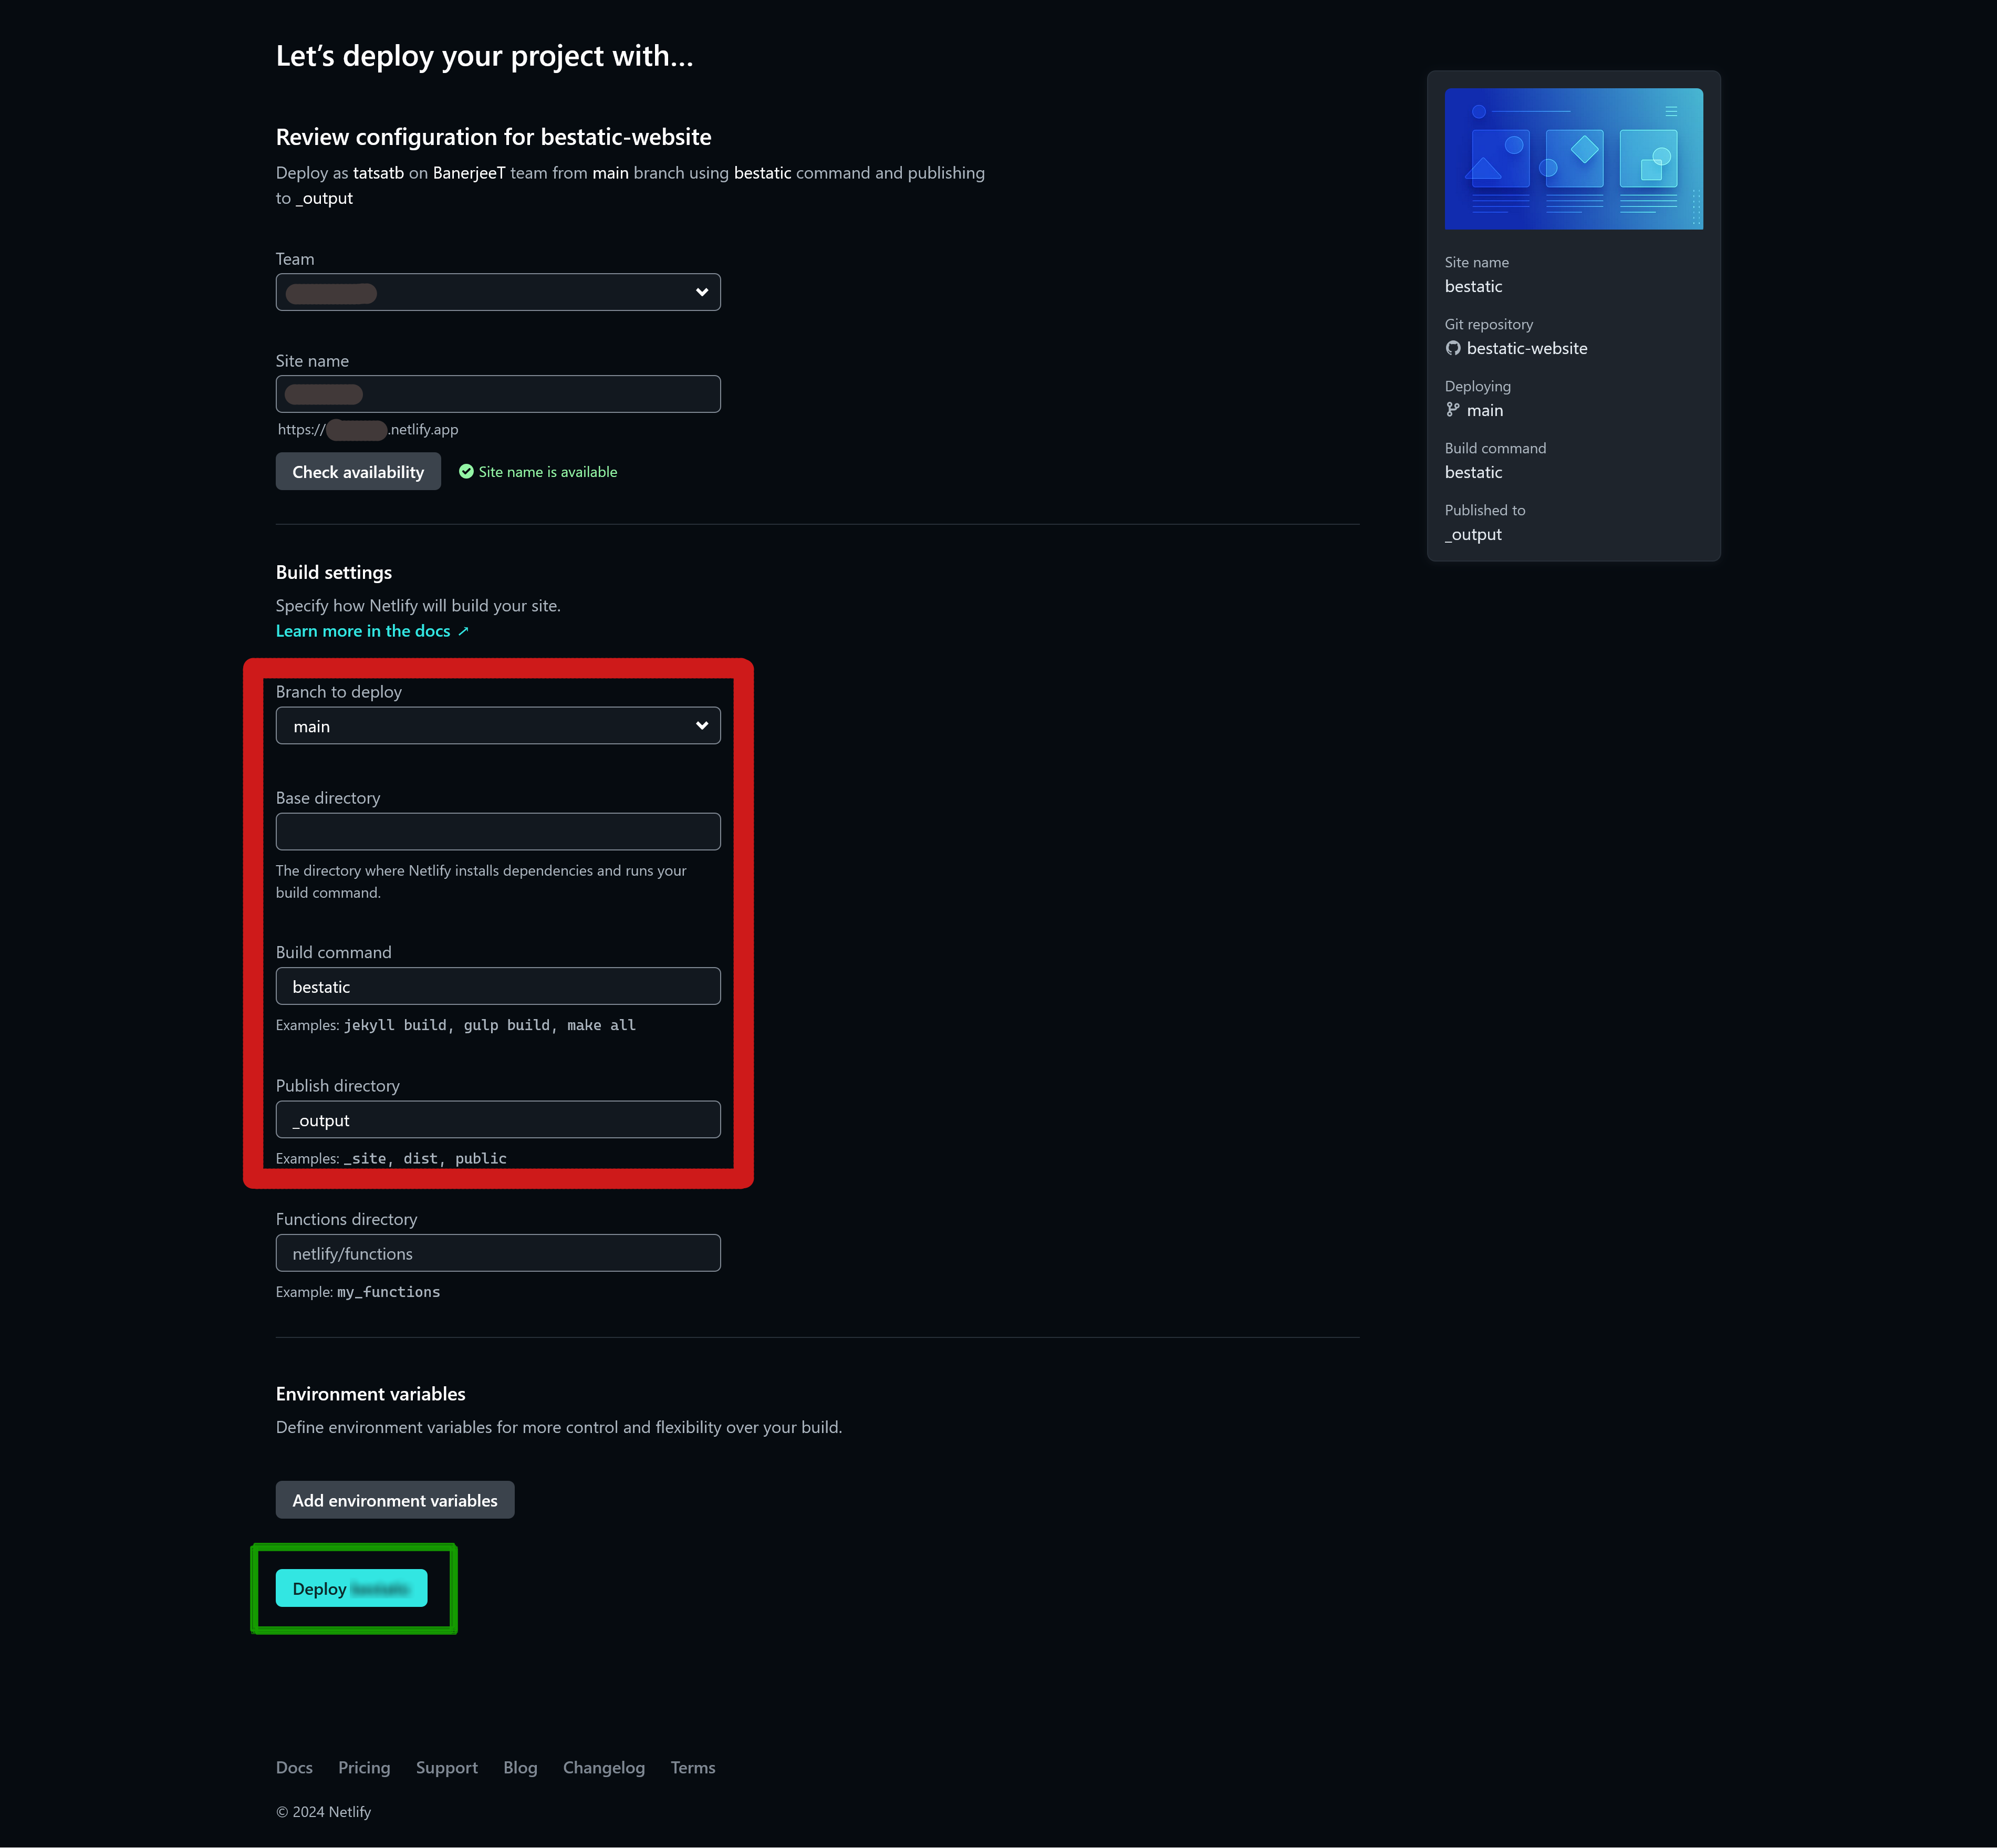
-
Once you have supplied correct build settings, Click on Deploy button at the end of the page (green rectangle in the above picture) and wait for the deployment to complete (it should take less than half a minute or so for a demo website).
-
As soon as deploy is completed, go to https://mybestaticsite.netlify.app to view your website.
And you are done! Now, every time you push a change to your GitHub repo, Netlify will automatically detect it, rebuild your website, and deploy it to the same URL. If you want to use custom domains and automated HTTPS, you can do so for free. Netlify offer a robust domain management services for free: Visit this page and this page to get started with those.
Vercel
Vercel pretty much works same way as Netlify and Cloudflare pages do (as described above), with some modifications. Vercel offers continuous deployment, a global CDN/edge network, DNS support, automated HTTPS, etc., with a generous free tier. Although, please note that, to best of my knowledge, Vercel does not allow business use on their free tier.
We are assuming you at least completed the Quickstart and gone through the introduction above to host your files on GitHub. The procedure will be essentially the same, even if you are using GitLab to host your files.
Now, the following procedure will enable continuous deployment from a GitHub repository (i.e., whenever you push a change to your GitHub repo, Vercel will automatically rebuild and deploy your site).
-
Sign up for a Vercel account.
-
Add a requirements.txt file to the root location of your GitHub repo. That file should have this line (include the latest version of Bestatic after == sign):
1Bestatic==0.0.28 -
Add a package.json file to the root location of your GitHub repo. That file should have these lines:
1
2
3
4
5
{ "engines": { "node": "18.x" } } -
From the vercel dashboard (i.e, the page you see when you log in), click on Import Project, as shown below.
.PNG)
-
Once you log in to GitHub (or GitLab etc., if you host your files there) upon prompt and give Vercel permission to access your one or more repos, you should see this screen. You should click the Import to import the repo of your website.
.PNG)
-
If you see this screen from GitHub, you should click on the account where you want to Install Vercel.
.PNG)
-
Once you are back on the Vercel website, you should see this page. Select a Project Name; your website will be available at mybestaticsite.vercel.app URL, if you select your Site name as mybestaticsite.
The build settings is the most important step. Insert the values that are shown in the figure below; i.e., select these exactly:
Framework preset: Other
Root Directory: ./
Build command: bestatic
Output directory: _output
Install Command: (keep empty/unchanged)
.PNG)
Once you have supplied correct build settings, Click on the Deploy button at the bottom and wait for the deployment to complete.
-
That's it! You should see a page like this. You can continue to dashboard. You can also click Add Domain (shown in green rectangle), to start adding a custom domain. Here and here are Vercel Tutorials that will help you to configure your custom domain.
.PNG)
You can always visit https://mybestaticsite.vercel.app to view your website anytime (even if you have setup a custom domain).
Render
Render pretty much works same way as Netlify and Cloudflare pages do (as described above), with some modifications. Render offers continuous deployment, a global CDN network, DNS support, automated HTTPS, unlimited collaborators,etc., with a generous free tier.
We are assuming you at least completed the Quickstart and gone through the introduction above to host your files on GitHub. The procedure will be essentially the same, even if you are using GitLab to host your files.
Now, the following procedure will enable continuous deployment from a GitHub repository (i.e., whenever you push a change to your GitHub repo, Render will automatically rebuild and deploy your site).
-
Sign up for a Render account.
-
Add a requirements.txt file to the root location of your GitHub repo. That file should have this line (include the latest version of Bestatic after == sign):
1Bestatic==0.0.28 -
From the Render dashboard, click on New Static Site, as shown below.
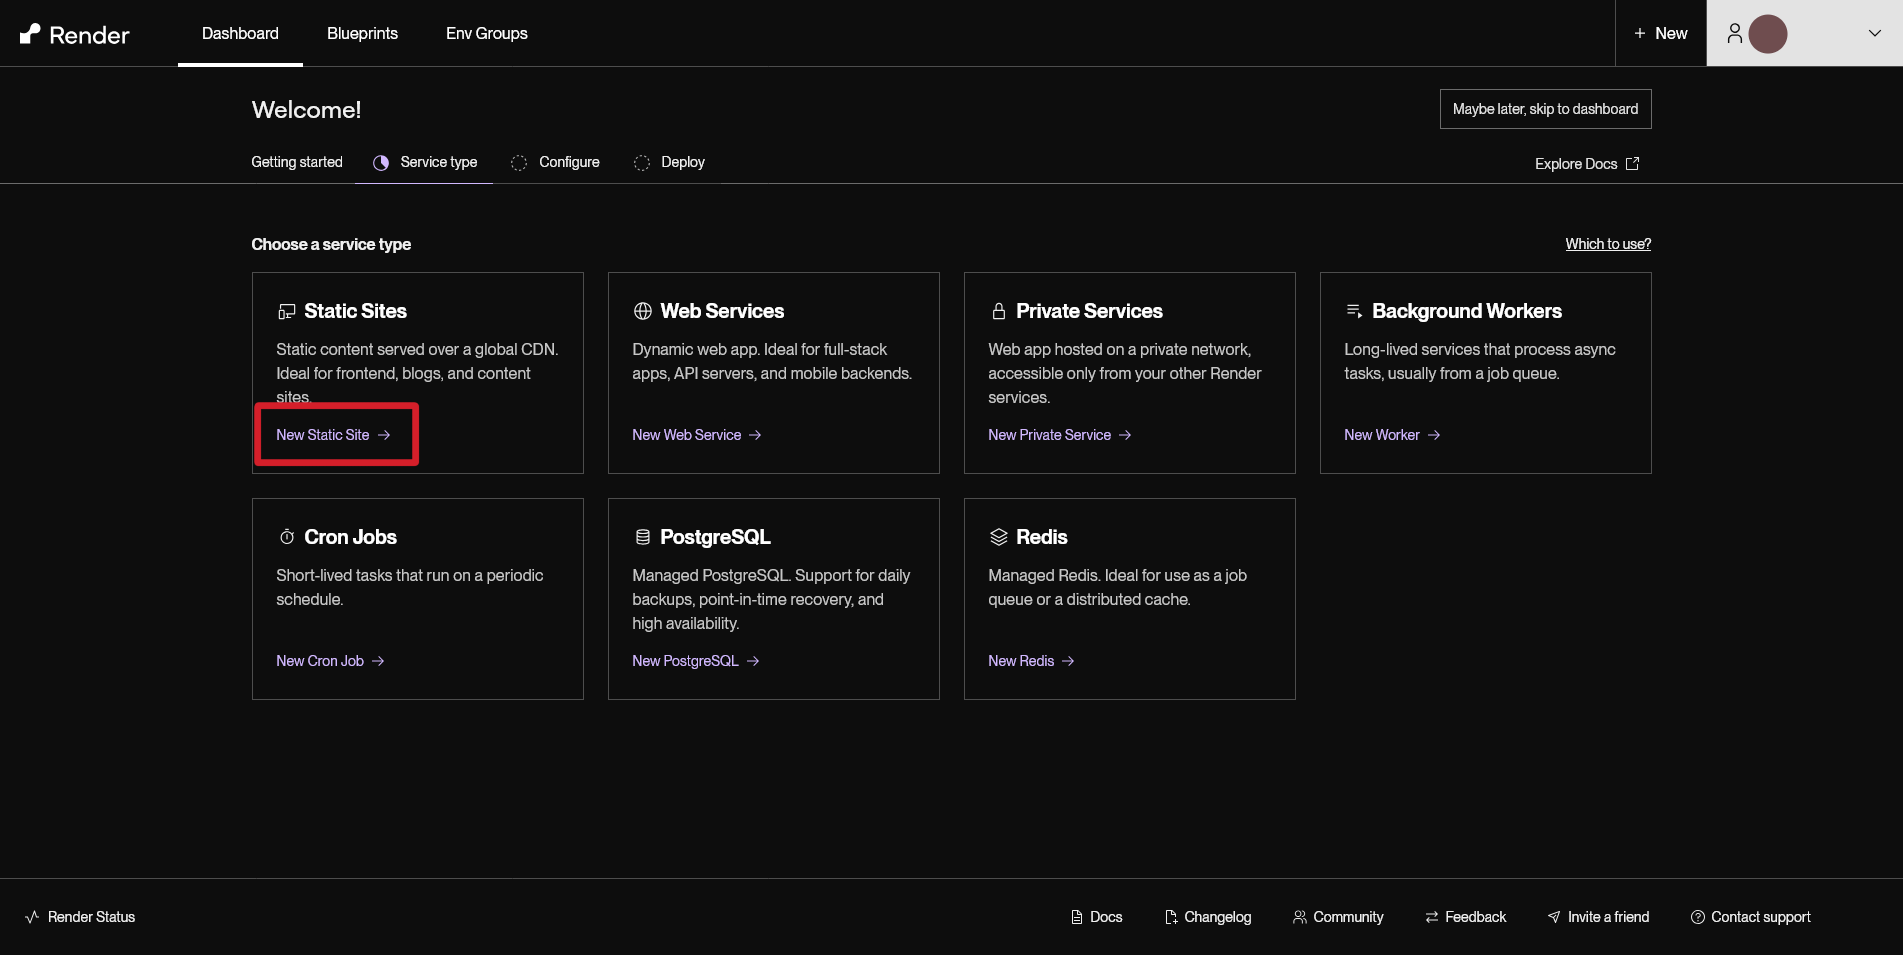
-
When you see the following screen, select GitHub from the Git Provider tab (or select GitLab/Bitbucket, if you are using those).
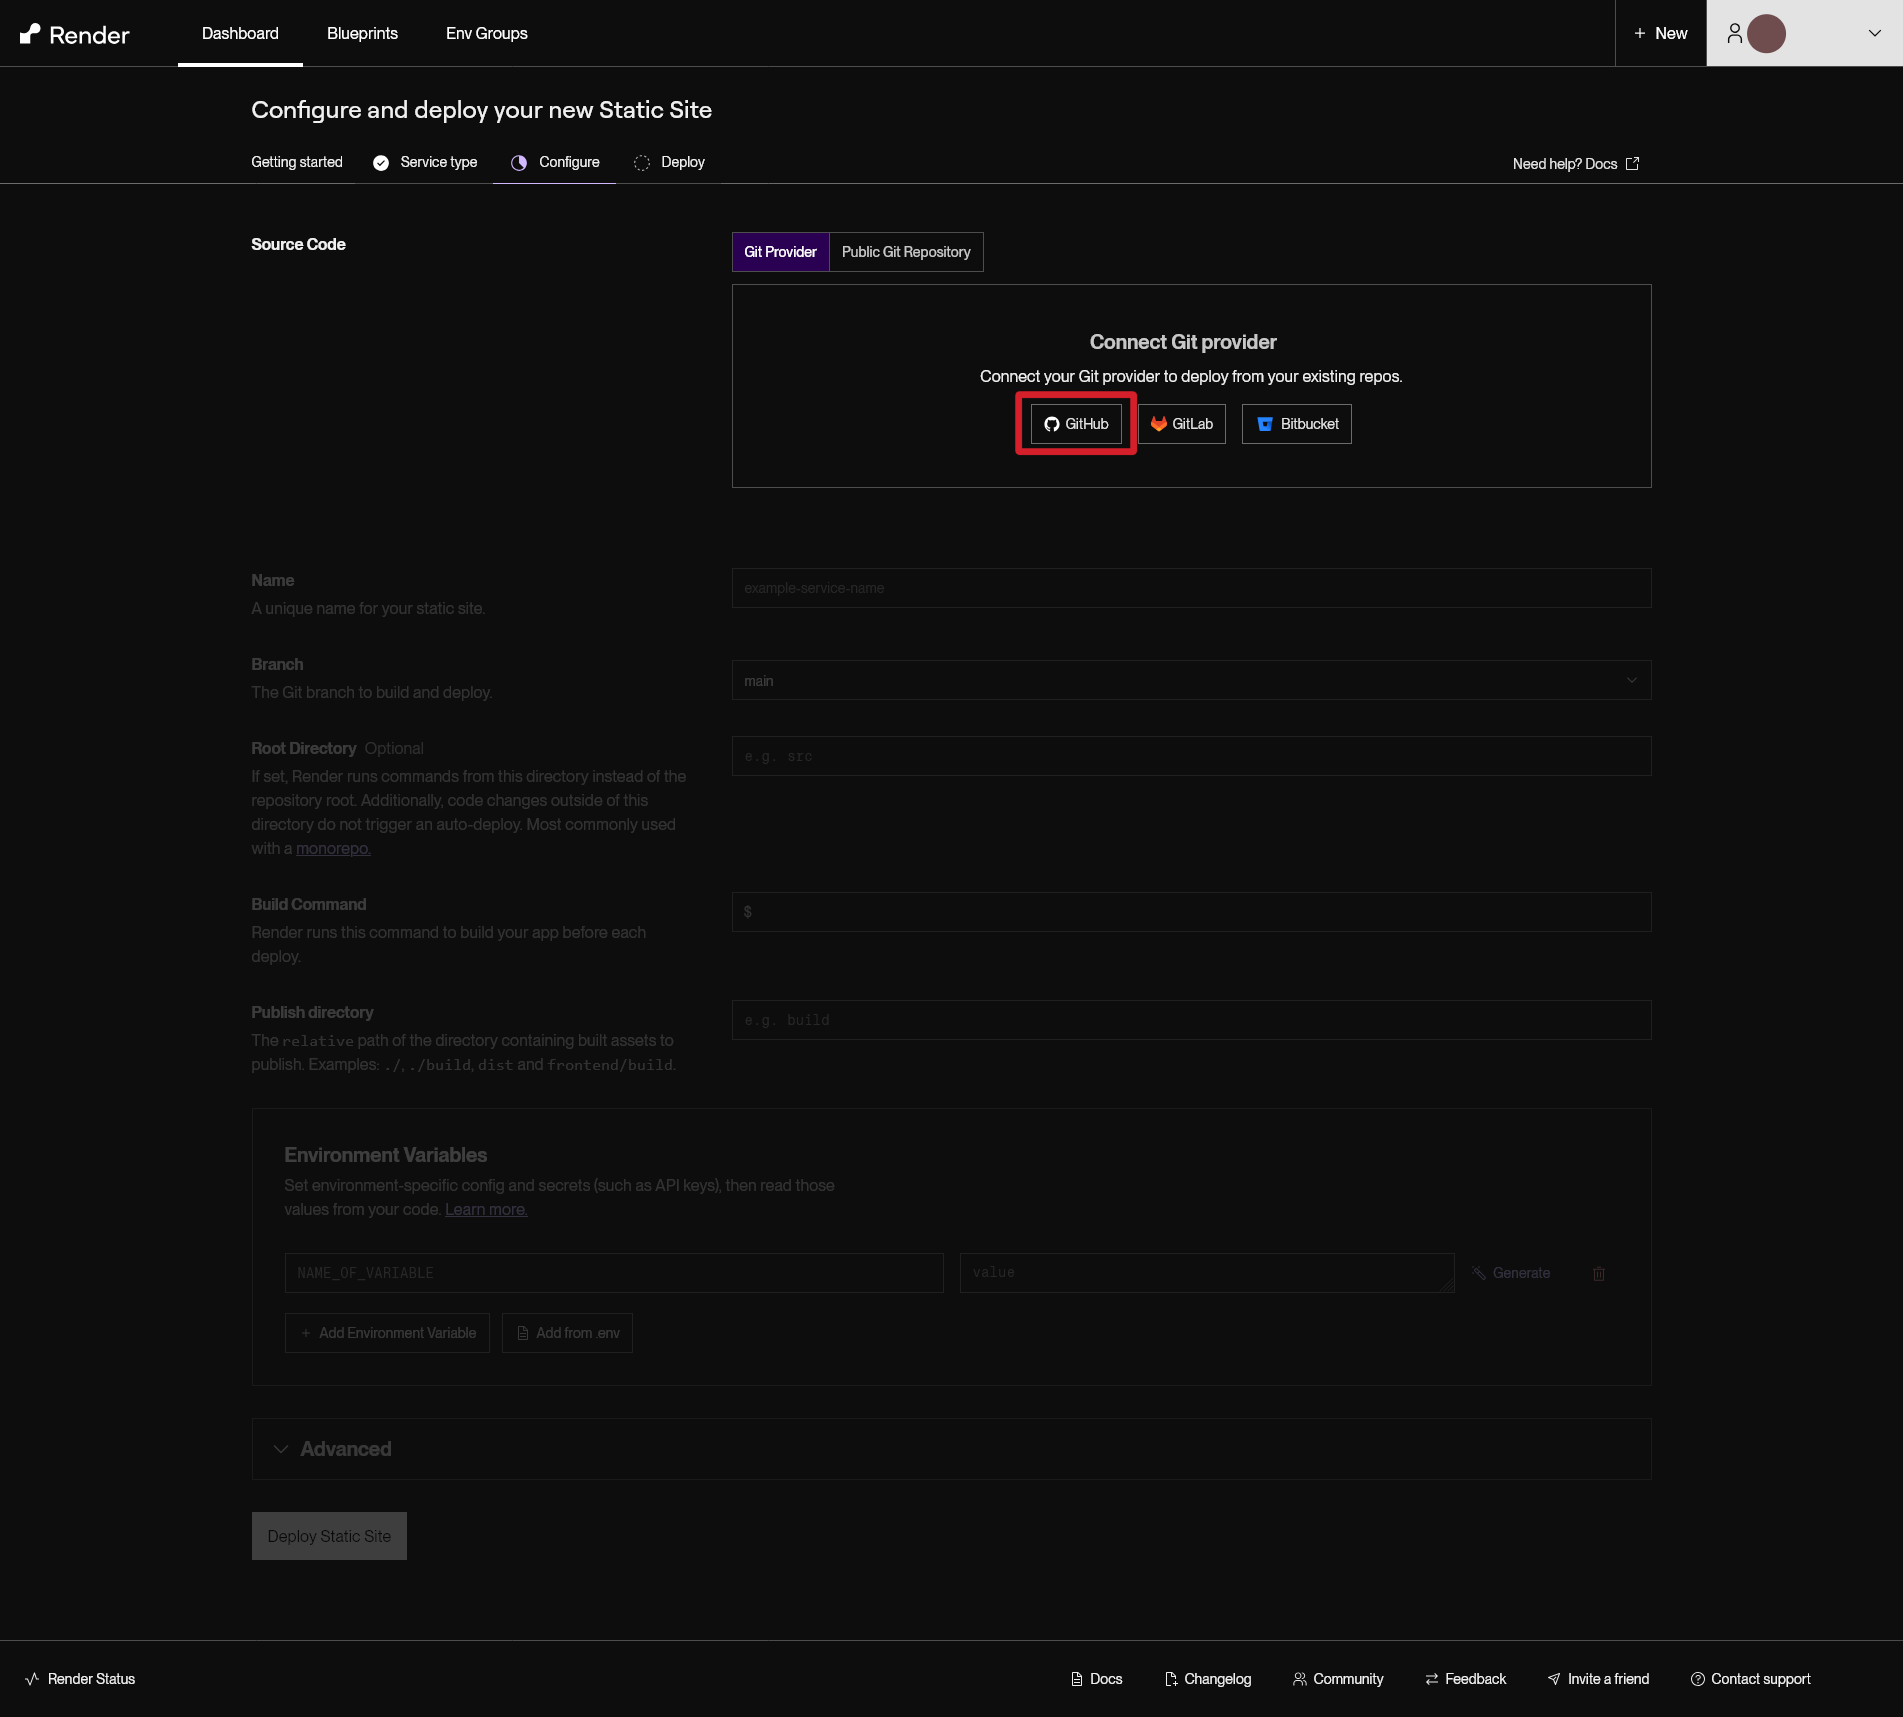
-
Upon login to GitHub, if you see this screen from GitHub, you should click on the account where you want to Install Render.

-
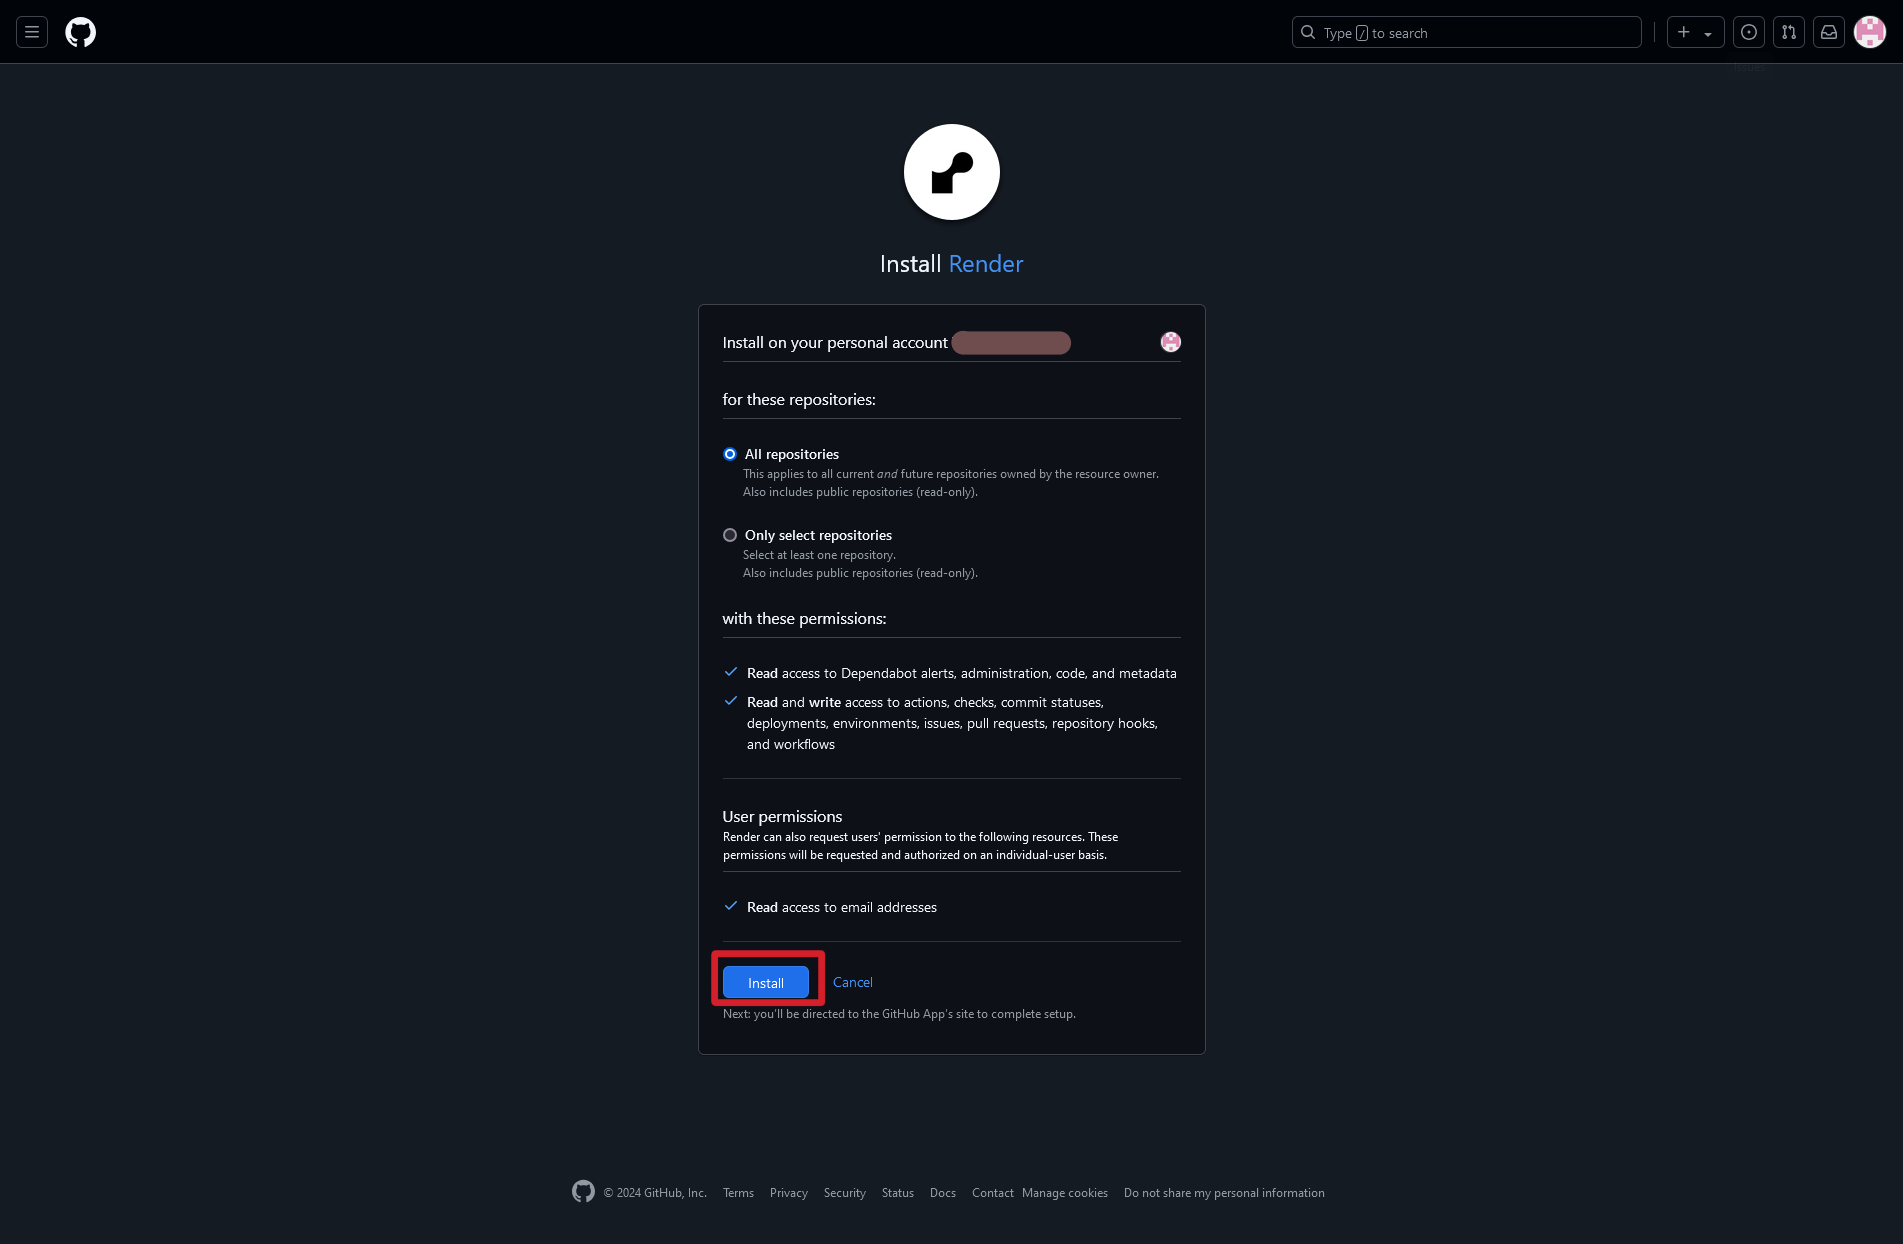
You should then Install Render page on GitHub. You should click on the Install button. You can also install it to just your Bestatic website repo (by selecting Only select repositories).
-
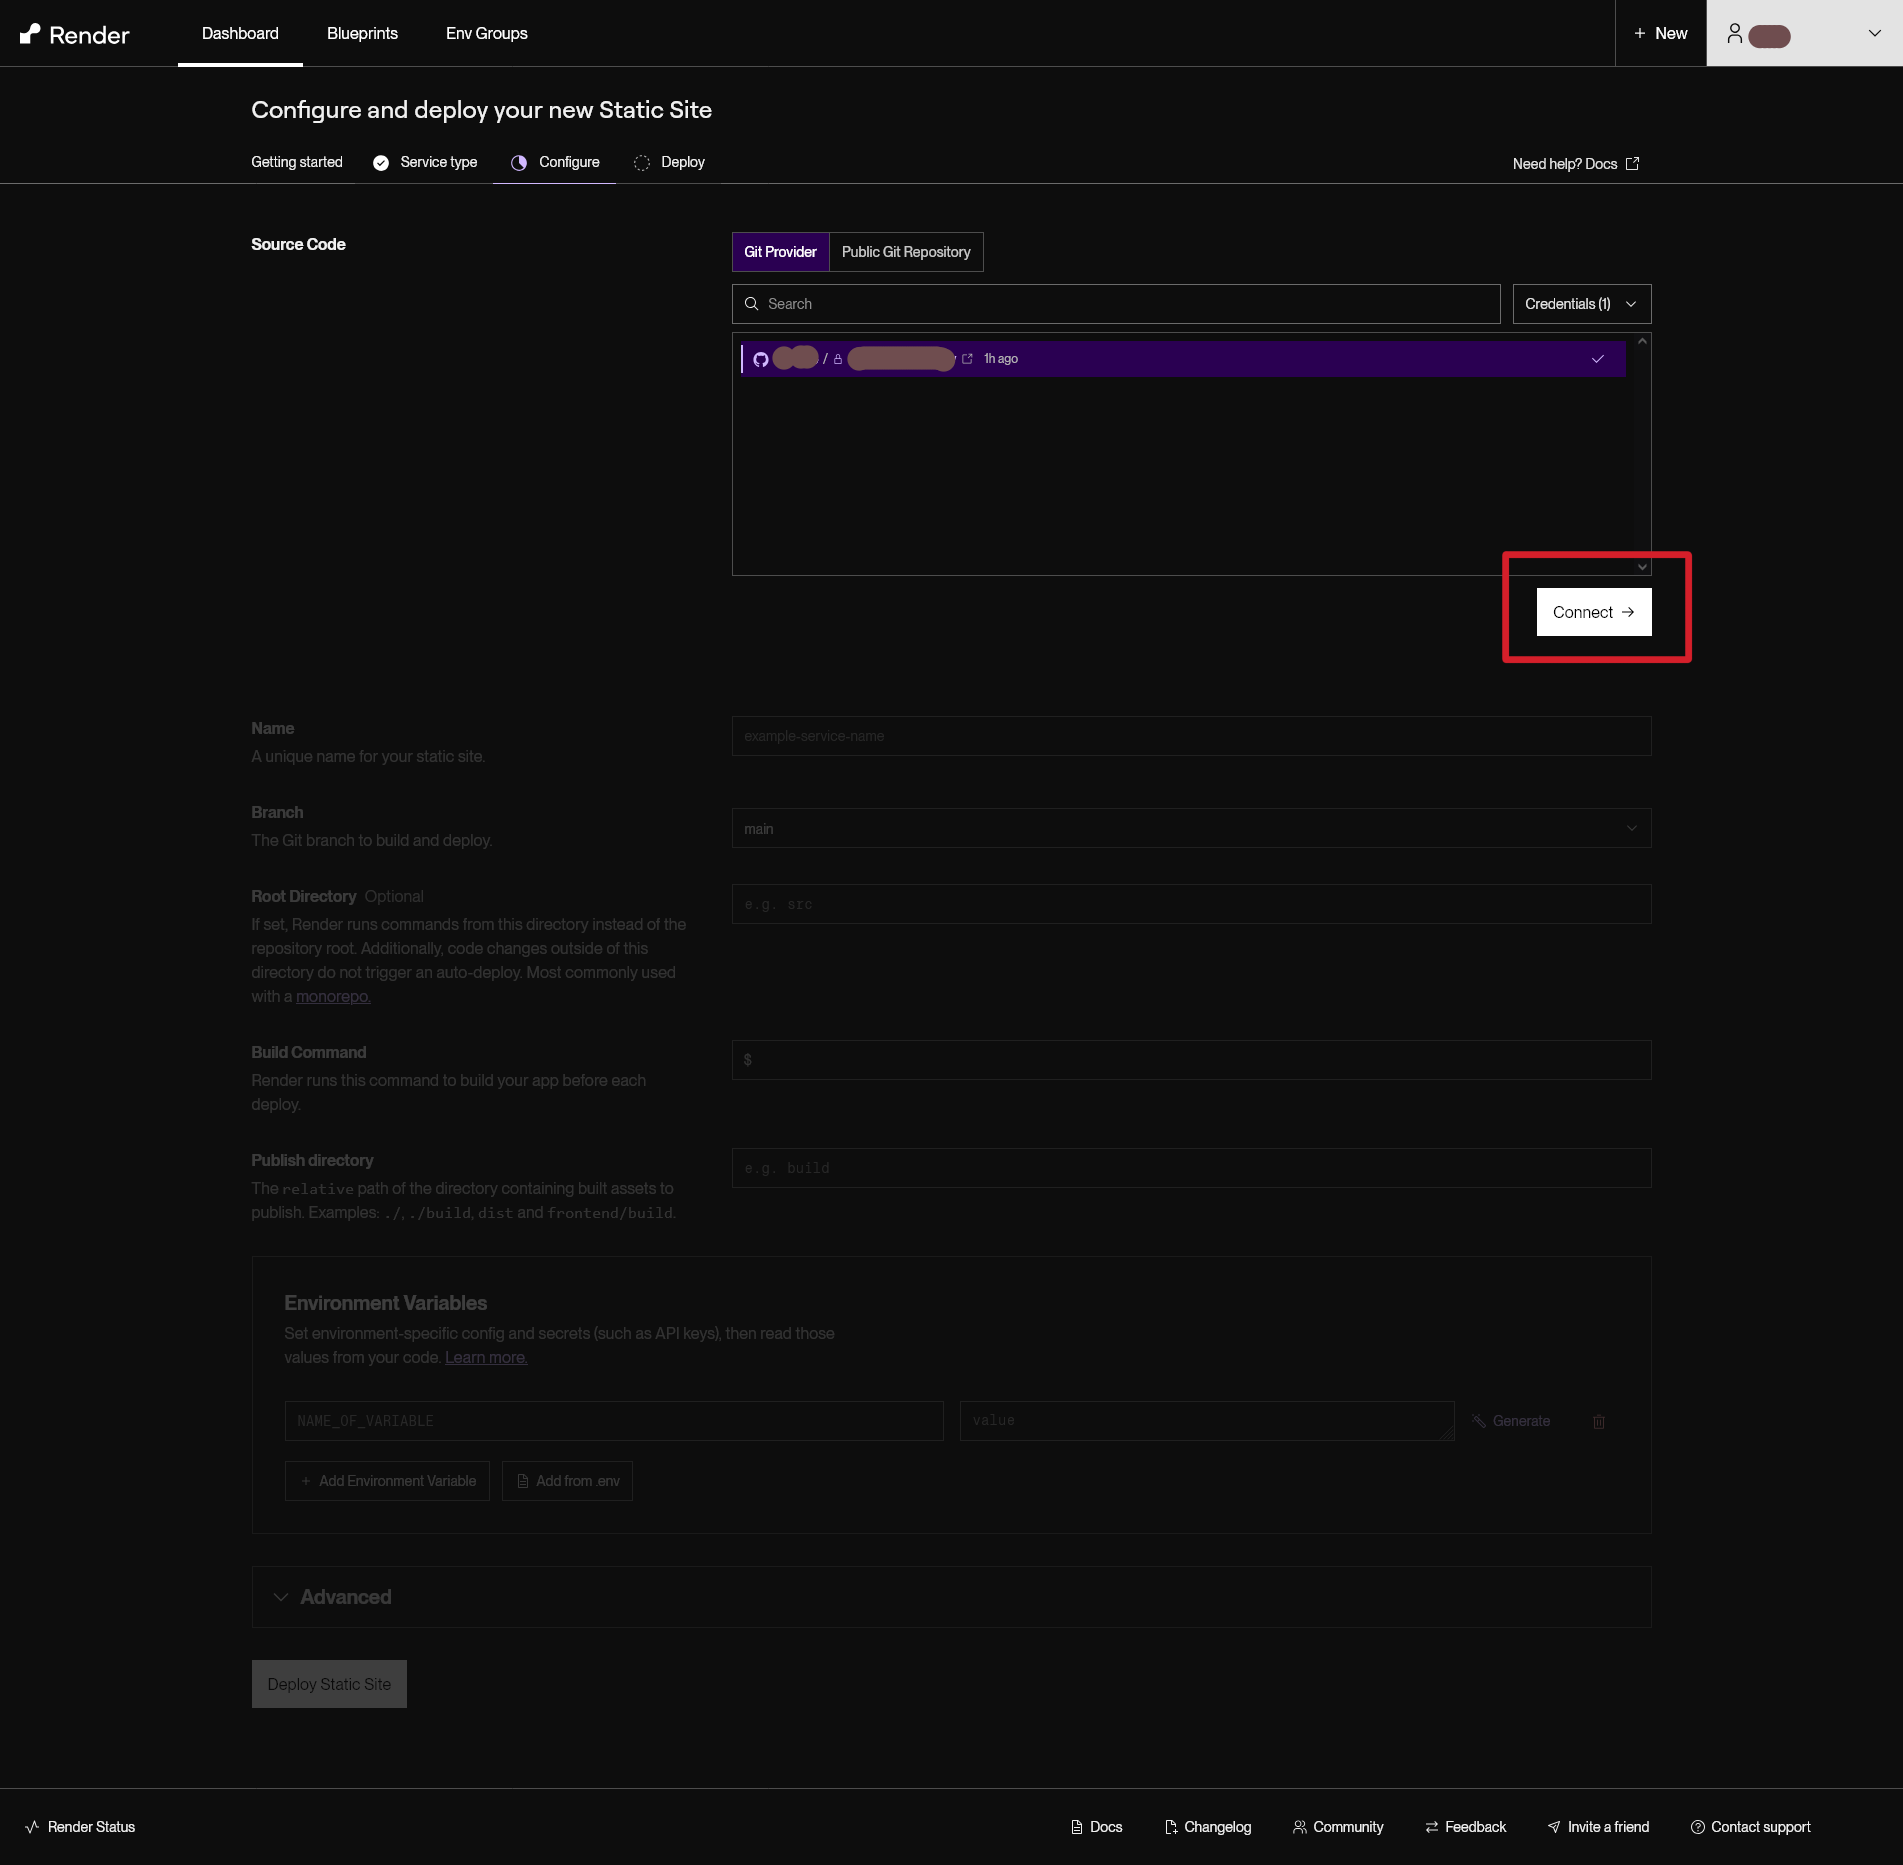
Once you return to Render website, you should select the repo of your website and click Connect button.
-
Now, input a Name for your static site; your website will be available at mybestaticsite.onrender.com URL, if you select your Site name as mybestaticsite.
The build settings is the most important step. Insert the values that are shown in the figure below; i.e., select these exactly:
Branch: main
Root Directory: (keep empty/unchanged)
Build command: bestatic
Publish directory: _output
Note: Although not needed (or recommended), but if you wish, you can use a specific version of Python, by going to Environment variables, pressing Add Environment variable and setting the PYTHON_VERSION variable with the value of 3.10 (or something else).

Once you have supplied correct build settings, Click on the Deploy Static Site button at the bottom and wait for the deployment to complete.
-
Once you see the deployment is completed, you should see "Your site is live" message (as shown in red rectangle).
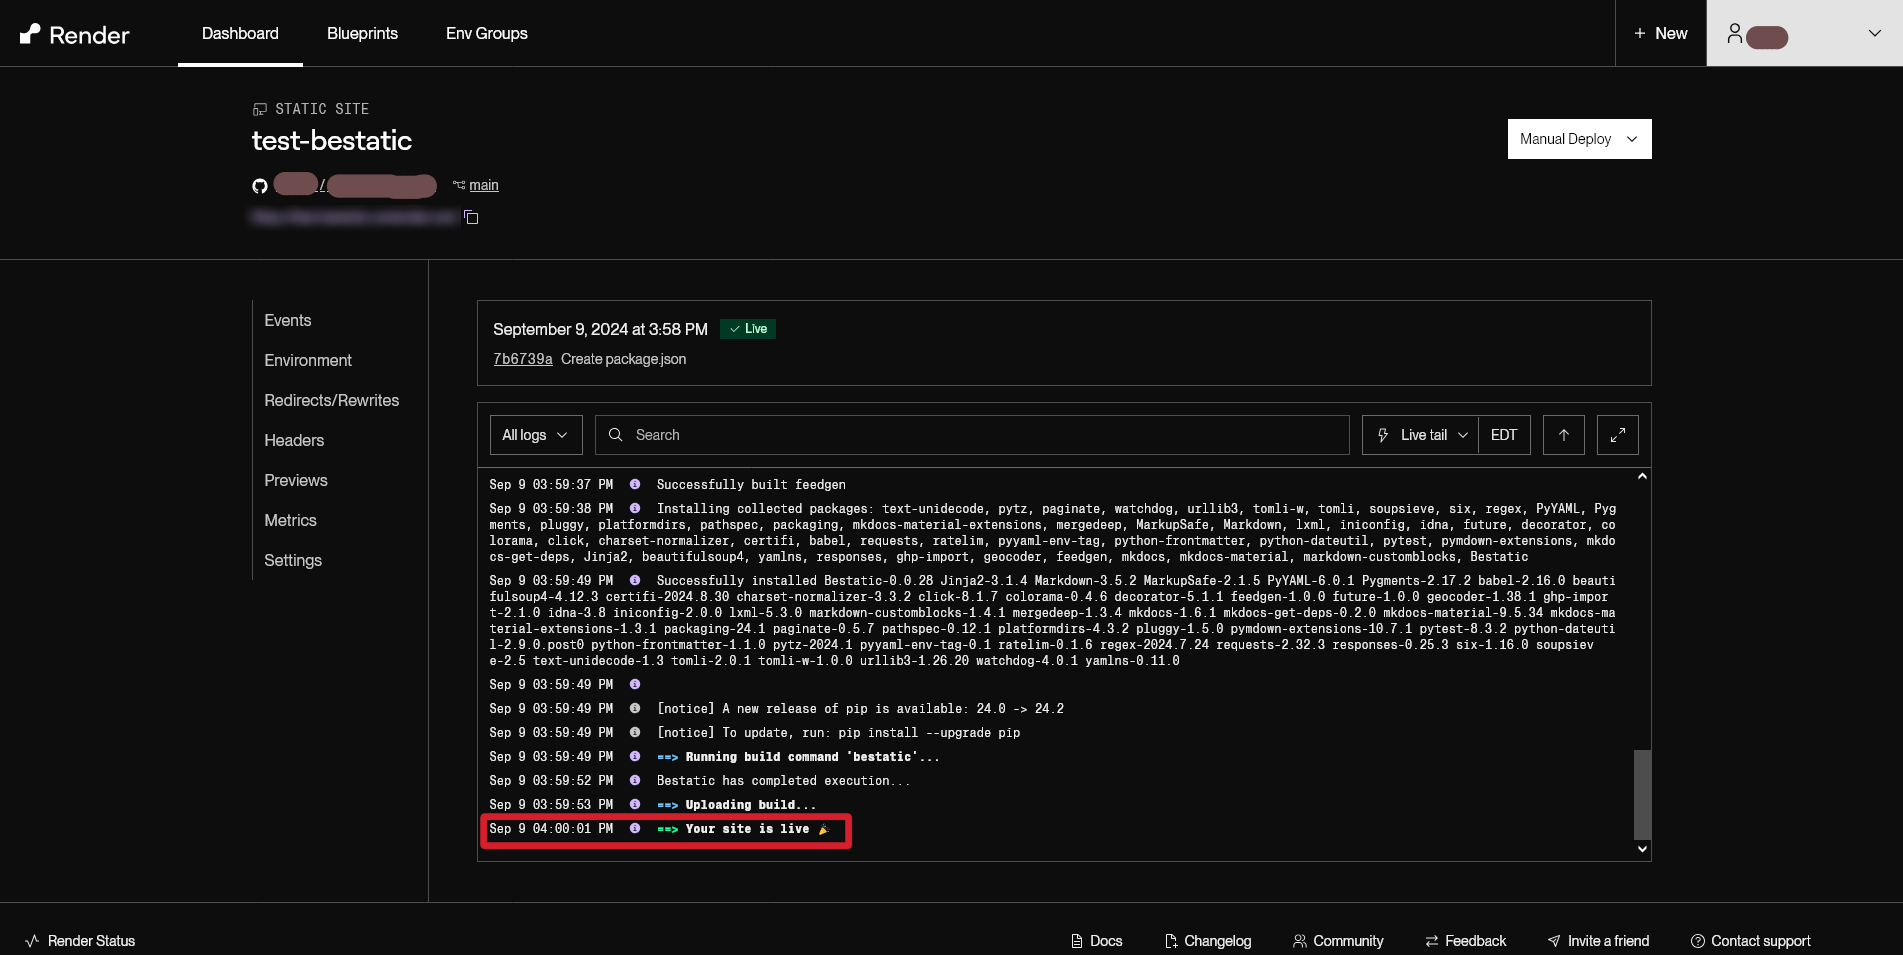
And that's it! You can visit https://mybestaticsite.onrender.com to view your website. Render offers Fully Managed TLS Certificates (HTTPS) and global CDN without any set up on your part. To setup a custom domain on render, you can get started here.
Firebase
Firebase is Google's mobile and web app development platform. You can host your static website with Firebase free tier.
We are assuming you at least completed the Quickstart and gone through the introduction above to host your files on GitHub. The procedure will be essentially the same, even if you are using GitLab to host your files.
Now, the following procedure will enable continuous deployment from a GitHub repository (i.e., whenever you push a change to your GitHub repo, Firebase will automatically rebuild and deploy your site).
-
Sign in to Firebase with your Google account and go to Firebase console.
-
Create a project (unless you already have a Firebase project) and when project is created, from the left side menu, go to: Build > Hosting > Get started. your website will be available at mybestaticsite.web.app URL, if you select your Site name as mybestaticsite.
-
Install Firebase CLI on your local machine. If you are already familiar with Node.js and have an existing Node.js installation, use npm to install it (recommended way).
1npm install -g firebase-toolsOtherwise, use directly install from the standalone binary for your OS.
-
Open a terminal window and navigate to the folder where your Bestatic website files is located (using cd).
-
Type the following and follow the CLI prompt:
1
2
firebase login firebase init -
From there just follow the CLI prompts and answer Yes (Y) to any initial questions. Select the following (press Space key to select any particular option and Enter key to confirm):
Hosting: Configure files for Firebase Hosting and (optionally) set up GitHub Action deploys? What do you want to use as your public directory?_output? Configure as a single-page app (rewrite all urls to /index.html)? (y/N)N? Set up automatic builds and deploys with GitHub? (y/N)y
-
After this GitHub will open and will ask you to login, authenticate, authorize, etc. After you do that and grant Firebase required permissions, you should see:
1+ Success! Logged into GitHub as <username> -
Next you should see this questions:
? For which GitHub repository would you like to set up a GitHub workflow? (format: user/repository)Use your values, for e.g., username/mybestaticsite
You should then see:
1
2
3
+ Created service account github-action-<123456789> with Firebase Hosting admin permissions. + Uploaded service account JSON to GitHub as secret FIREBASE_SERVICE_ACCOUNT_AMAZING_STATIC_DEMO. i You can manage your secrets at https://github.com/username/mybestaticsite/settings/secrets. -
Next sets of questions and answers should be:
? Set up the workflow to run a build script before every deploy? (y/N)Y? What script should be run before every deploy? (npm ci && npm run build)pip install Bestatic && bestatic? Set up automatic deployment to your site's live channel when a PR is merged? (Y/n)Y? What is the name of the GitHub branch associated with your site's live channel? (main)Press Enter
-
Then you should see: "+ Firebase initialization complete!". Then, with your favorite text editor, open firebase.json file that Firebase CLI generated on the root of your website and add these lines right after
"public": "_output"line:1 2 3 4 5 6
"rewrites": [ { "source": "**", "destination": "/404/index.html" } ], -
Add, commit, and push all these new files to your GitHub repo and you are done!
-
Once Firebase completes deployment, your static site should be available on: mybestaticsite.web.app. Every time you make a change to your GitHub repo, Firebase would detect those changes and build the updated version of the website on the same URL.
Of course, you can setup custom URL. CLick on the "Add custom domain" button on your Firebase project dashboard to get started. Detailed documentation on this is available here.
Manual Deployment
Manual deployment is easy since the websites Bestatic generate are essentially a bunch of static files that reside inside a particular directory (_output folder, by default).
You can upload this folder via Rsync as long as you have SSH access to your server (VPS server or shared hosting). If you are interested to learn how to setup a simple VPS server, install LAMP stack, install LEMP stack, use Rsync, etc., see the linked tutorials.
For Bestatic website, you can just use one command to achieve everything, as long as you have configured your server correctly:
1 | |
Here USER should be your username on server distribution, HOST is the IP address or hostname of your web host, DEST is the destination folder which can be something like /var/www/.
If you are here, that means you have probably glanced through the entire documentation! Thank you! If you are facing any issues or have any questions, please feel free to talk with us over our GitHub discussions page. We would love to help. Thanks again for trying out Bestatic!